
Getting started
This guide takes a facility from nothing to a working first request in three steps.
Before you begin
- Select the facility you want to configure using the facility selector in the main Performance Hub toolbar.
- Have a billing card stored for the facility. Top-ups charge your stored billing card; if none is on file, the Balance & Top-up page shows "No card on file." with an Add payment details link.
Step 1 — Enable the module
Open AI Models, Credits & Usage from the main menu. If the module has not been enabled for this facility yet, the Overview tab shows an enable prompt:
"Enable AI Models, Credits & Usage — Turn on prepaid AI inference for this facility. We will provision a secure inference key; you can then top up a balance and create API keys."
Click the enable button. Provisioning takes a few seconds (the button shows "Enabling…").
Step 2 — Make your first top-up
Go to Budgets & Limits → Balance & Top-up.
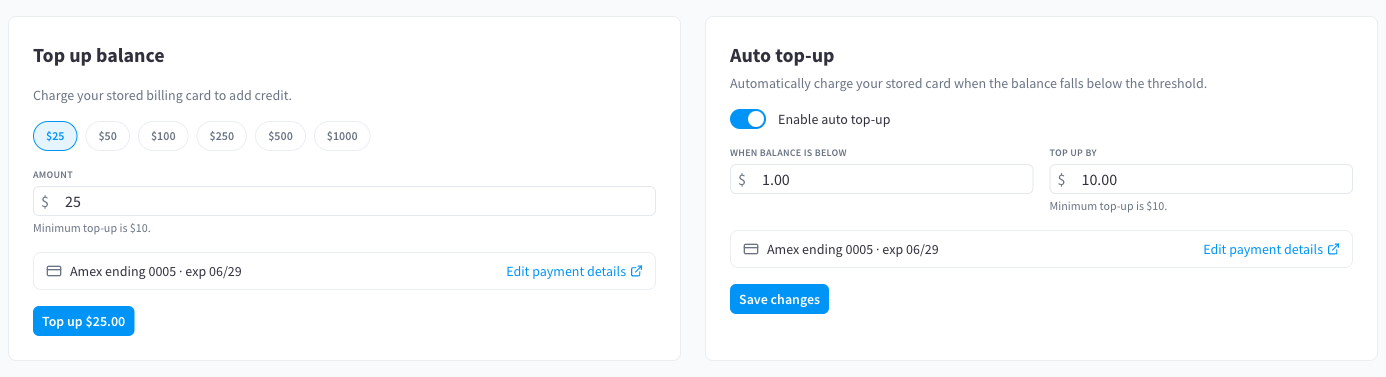
Figure 1: The Top up balance card (presets, amount, stored card) and the Auto top-up card
- In the Top up balance card, pick a preset ($25, $50, $100, $250, $500, $1000) or type an amount. "Minimum top-up is $10."
- Check the stored card shown beneath the amount (e.g. "Amex ending 0005 · exp 06/29"). Use Edit payment details if it needs updating.
- Click Top up $–.––. On success you'll see "Top-up successful. Your balance has been credited." Top-ups appear in the balance instantly.
Recommended: in the Auto top-up card, switch on Enable auto top-up, set When balance is below and Top up by (also minimum $10), and click Save changes. Your card is then charged automatically whenever the balance falls below the threshold, so inference never stops unexpectedly. See Budgets & top-ups for details.
Step 3 — Send your first request
Pick whichever path applies to you:
If you have AI Agents
Nothing to configure — AI Agent devices paired with this facility connect to AI Models automatically. Open Settings (cog) → Agent Access & API Keys and confirm your agent appears under Connected AI Agents with status Online. See AI Agents.
If you're connecting your own software
- Open Settings (cog) → Agent Access & API Keys and click Create key. Copy the secret from the "Copy your API key" dialog — "This is the only time the full key is shown. Store it somewhere safe."
- Use the Base URL and example request shown in the Connecting to the API card on the same page. A minimal test:
curl https://app.performancehub.co/ai/v1/chat/completions \
  -H "Authorization: Bearer YOUR_API_KEY" \
  -H "Content-Type: application/json" \
  -d '{"model": "auto", "messages": [{"role": "user", "content": "Hello"}]}'
See Connecting your application for Python and TypeScript examples.
Step 4 — Verify
Open the Logs tab. Your test request should appear within moments, with its model, token counts, cost, speed, and a success status. If it doesn't, see Troubleshooting.
Recommended next steps
- Set spend limits — Budgets & Limits → Spend Limits. A monthly cap is a sensible safety net; see Budgets & top-ups.
- Review the model catalog — Settings → Models. All models are enabled by default; use the quick presets to narrow the set if you have provider or budget preferences. See Models.
- Consider guardrails — Settings → Guardrails for PII masking, secret redaction, and prompt-injection shielding. None are enabled by default. See Guardrails.