Coaching Screen Configuration
Complete guide to setting up, configuring, and managing digital workout displays in your facility.
Screen Overview
Coaching Screens are digital displays that show workout routines, timing, and guidance to members during training sessions. Screens automatically display content based on your facility's workout programs and can be synchronized across multiple displays for consistent timing.
Key Capabilities:
- Automatic workout content display
- Multi-screen synchronization
- Real-time timing and countdowns
- Audio output (including Sonos integration)
- Remote content management
- Automatic content updates
- Equipment number identification
Adding a New Screen
Before You Begin
Network Requirements:
- Strongly recommended: Ethernet connection for each screen
- If using WiFi: 5GHz band with strong signal (above 70%)
- Stable internet connection for content delivery
- Available power outlet near screen location
Hardware Requirements:
- TV or display with HDMI input
- Screen mounting (wall mount, ceiling mount, or stand)
- Performance Hub coaching screen device
- HDMI cable
- Power cable
Physical Requirements:
- Clear view from workout area
- Appropriate viewing distance (depends on screen size)
- Mounting location secure and level
- Cable management for professional appearance
Installation Steps
-
Physical Installation:
- Mount TV/display in desired location
- Connect coaching screen device to TV via HDMI
- Connect Ethernet cable to coaching screen device (strongly recommended)
- Connect power to coaching screen device
- Power on TV and select correct HDMI input
-
Wait for QR Code to Appear on Screen:
- Takes 1-2 minutes for device to boot and display QR code
- QR Code Location: Automatically displayed on the screen itself
- QR code contains pairing ID for device registration
- Screen will continue displaying QR code until added to Performance Hub
-
Scan QR Code to Add Screen:
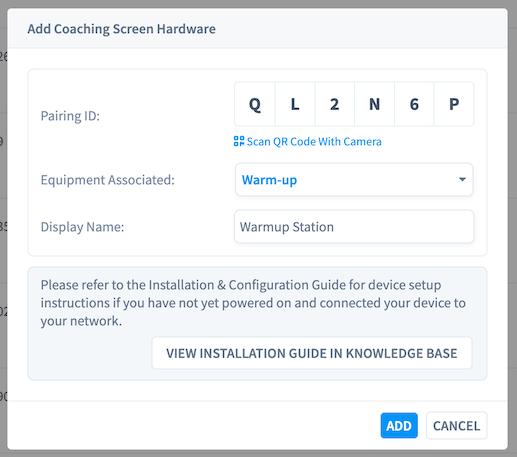
Three Ways to Add:
Option A: Scan QR Code First (Fastest)
- Use phone camera to scan QR code displayed on screen
- Performance Hub "Add Coaching Screen Hardware" dialog opens automatically
- Pairing ID is pre-filled
Option B: Scan from Add Device Dialog
- Click "Add New Device +" in Device Management
- Select "Coaching Screen"
- Click "Scan QR Code With Camera"
- Point camera at QR code on screen
- Pairing ID automatically filled in
Option C: Manual Entry
- Click "Add New Device +" in Device Management
- Select "Coaching Screen"
- Manually type pairing ID from screen display
- Use if QR code scanner not working
-
Enter Screen Details:
- Screen name (location-based: "Main Room Screen", "Boxing Ring Display")
- Room or area assignment
- Equipment number (automatically assigned)
- Equipment Associated: Select equipment configured by your organizational administrator
- Equipment options vary depending on how your brand has equipment setup
- This determines what content the screen displays
- Configured by organizational administrator in brand settings
- Enter display name
- Click "Add"
-
Screen Added to Device Management:
- Screen appears online immediately
- QR code disappears from screen
- Screen displays welcome content or setup screen
- Status shows "Online" in Device Management
-
Configure Screen Settings (detailed below)
Screen Configuration Settings
Basic Settings
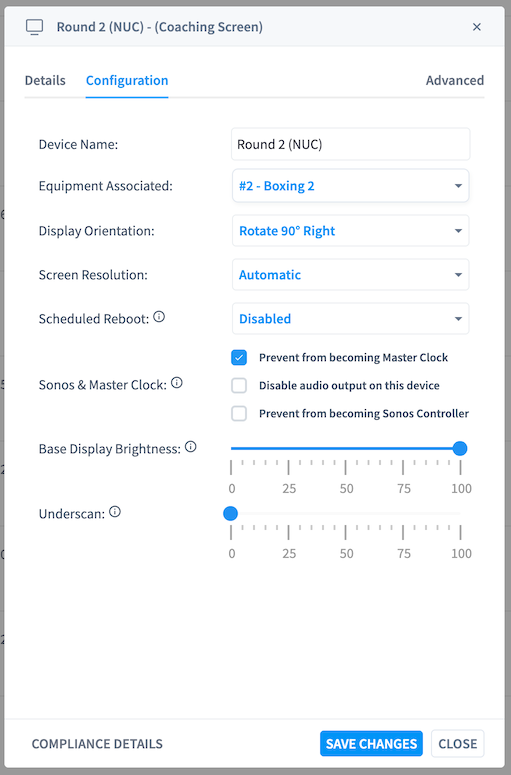
Screen Name
- Use descriptive names based on location
- Examples: "Main Training Floor", "Boxing Ring Screen", "Circuit Training Area"
- Include screen position if multiple in same room: "Front Screen", "Back Screen"
- Keep names consistent across facility
Room Assignment
- Assign screen to specific workout area
- Helps organize content delivery by location
- Allows zone-specific programming
- Important for multi-screen synchronization
Equipment Number
- Automatically assigned unique identifier
- Displayed when using "Identify Devices" feature
- Shows on screen for 30 seconds when identified
- Used to physically match screens to system
Display Settings
Screen Orientation:
- Landscape (standard for most installations)
- Portrait (vertical orientation for specific content)
- Match physical TV mounting orientation
Display Resolution:
- Automatically detected from connected TV
- 1080p (Full HD) - most common
- 4K - for high-resolution displays
- Should match TV's native resolution
Base Display Brightness:
- Slider adjustment from 0-100%
- Sets baseline brightness for all content
- Adjust based on ambient lighting
- Higher brightness for well-lit areas
- Lower brightness for darker environments
Underscan:
- Slider adjustment from 0-100%
- Adjusts image size relative to TV display area
- Use if screen content appears cut off at edges
- Lower values create border around content
- Higher values fill entire screen
- Start at 0 and adjust if needed
Scheduled Reboot:
- Automatically restart screen at scheduled time
- Disabled by default
- Can be enabled to improve performance
- Useful for screens running 24/7
- Typically scheduled during facility closed hours
Sonos & Master Clock Settings
These settings control performance-intensive services that run on the coaching screen device. Both services require at least 3 devices on the same network to function.
Prevent from becoming Master Clock
- Stops this screen from becoming the master clock for timer synchronization
- Use when: Device experiencing performance issues (overheating, old hardware, high CPU usage)
- Master clock service uses more CPU
- System automatically selects a different screen as master clock
- Only disable if screen is placed in hot location (near windows, poor ventilation) or showing performance issues
- At least 3 screens must remain enabled as potential master clocks
Disable audio output on this device
- Turns off all audio output from this specific screen
- HDMI audio to TV speakers disabled
- Screen still displays visual content normally
- Useful for screens in quiet areas or when audio not needed
Prevent from becoming Sonos Controller
- Stops this screen from relaying commands to Sonos speakers
- Use when: Device experiencing performance issues
- Sonos controller service uses more CPU
- Controller relays commands from Performance Hub to physical Sonos speakers
- Required for automations and Sonos control from Performance Hub
- System automatically selects a different screen as Sonos controller
- Only disable if screen showing performance issues or overheating
- At least 3 screens must remain enabled as potential Sonos controllers
When to Use These Options:
- Screen overheating (placed near windows, direct sunlight, poor ventilation)
- Older device with limited CPU performance
- Screen experiencing lag or slow response
- CPU temperature consistently high (check in Details tab)
- Free up resources for content display performance
Important: Disabling these services on too many screens can prevent master clock and Sonos controller functions from working. Always ensure at least 3-4 screens remain enabled for these services.
Content Settings
Content Source:
Content displayed on screens is automatically set based on the Equipment Associated selection during device setup.
- Content source configured by organizational administrator
- Determined by the equipment type selected when adding screen
- Screens automatically display appropriate workout content for their assigned equipment
- No manual content source configuration needed in Device Management
For detailed information about content management, scheduling, and workout programming, see the Coaching Screens user interface documentation (covered separately).
Content Features:
- Automatic display based on facility schedule
- Synchronized workout timing across screens
- Automatic transitions between rounds/exercises
- Rest period displays with countdown timers
- Bell timer and sound effects synchronized across all screens
Audio Configuration
Audio Output Options:
HDMI Audio (TV Speakers)
- Sound plays through connected TV speakers
- Simple setup, no additional equipment needed
- Volume controlled by TV remote
- Suitable for smaller facilities or individual zones
Sonos Speakers (Automatic Discovery)
- Sonos devices automatically discovered when at least 3 coaching screens are on the network
- Sonos speakers must be on the same network as coaching screens
- No manual device addition required - fully automatic
- Better sound quality and coverage for larger facilities
- Synchronized with workout timing and screen content
Note: For detailed Sonos configuration, volume control, speaker grouping, and audio management, see the Audio Control documentation section (covered separately).
Audio Sync:
- Bell timer and sound effects automatically synchronized across all screens
- Ensures consistent workout experience throughout facility
- Prevents echo or timing discrepancies
Multi-Screen Synchronization
How Synchronization Works:
Coaching screens automatically synchronize bell timers and sound effects using a low-latency network broadcast system.
Master Clock System:
- One device automatically becomes the "master clock"
- Master clock sets the workout timer
- All other screens read the broadcast message
- Bell timers and sound effects play in perfect sync across all screens
- No manual configuration required
Critical Network Requirement:
⚠️ All coaching screens MUST be on the same network for timer synchronization to work.
- If screens are on different networks or VLANs, timer synchronization will not work
- Screens on different networks will be out of sync
- May cause confusing bell timers at different times
- Ethernet strongly recommended for best synchronization reliability
Benefits:
- All screens display identical workout timing simultaneously
- Synchronized countdown timers and bell sounds
- Consistent member experience across entire facility
- No confusion from delayed or mismatched timing
Synchronization Accuracy:
- Within milliseconds across all screens on same network
- Best maintained over Ethernet connections
- May experience slight drift over WiFi (use Ethernet)
- Automatic master clock failover if current master goes offline
Network Settings
Connection Type:
Ethernet (Strongly Recommended):
- Most reliable for content delivery
- No buffering or loading delays
- Consistent synchronization across screens
- Lower latency for real-time updates
- Supports Power over Ethernet (if available)
WiFi (Use Only If Necessary):
- Requires strong signal (70%+ minimum)
- May experience occasional buffering
- Can affect multi-screen synchronization
- Use 5GHz band for better performance
- Monitor signal strength regularly
Network Configuration:
- IP Address: Automatically assigned (DHCP)
- Automatic configuration for Performance Hub connection
- No port forwarding required
- Firewall settings handled automatically
Content Management
Automatic Content Delivery
Coaching screens display workout content based on your facility's programming:
How It Works:
- Content is managed in the Coaching Screens module
- Screens automatically display scheduled content
- Updates happen in real-time
- No manual screen intervention needed
Content Types:
- Workout routines with timing
- Round-based training programs
- Circuit training displays
- Interval timing screens
- Welcome screens during downtime
Content Updates:
- Pushed to screens automatically
- Updates occur in seconds
- No screen restart required
- Screens always show current content
Screen Identification
Use the "Identify Devices" feature to physically locate screens:
How It Works:
- Click "Identify Devices" in Device Management
- Each screen displays its equipment number prominently
- Display lasts approximately 30 seconds
- Helps match physical screens to system
When to Use:
- Initial setup with multiple screens
- After repositioning screens
- When troubleshooting specific screen
- To verify which screen is which in system
What You'll See:
- Large equipment number displayed center screen
- Equipment number also shown in Device Management
- Screen returns to normal content after 30 seconds
Screen Maintenance
Regular Checks
Daily:
- Verify screens are displaying content
- Check that timing is synchronized across screens
- Note any display issues or errors
- Ensure screens are powered on
Weekly:
- Clean screen surfaces with microfiber cloth
- Check all cable connections are secure
- Verify audio output is functioning
- Test content transitions and timing
Monthly:
- Deep clean screens and surrounding area
- Inspect mounting hardware for security
- Check for screen burn-in or dead pixels
- Verify remote access functionality
- Test equipment identification feature
Quarterly:
- Update firmware (automatic at 2 AM)
- Check HDMI cable condition
- Inspect power cables and connections
- Verify network connection stability
- Review screen placement effectiveness
Temperature Management
Normal Operating Temperature:
- 30-60°C depending on usage and environment
- Higher with continuous use
- Display brightness affects temperature
Cooling Considerations:
- Ensure adequate ventilation around screen device
- Don't enclose device in tight spaces
- Keep air vents clear
- TV's own cooling system handles display heat
High Temperature Troubleshooting:
- Check CPU temperature in Details tab
- Enable "Prevent from becoming Master Clock" (Configuration tab) - reduces CPU load
- Enable "Prevent from becoming Sonos Controller" (Configuration tab) - reduces CPU load
- Check that device is not in enclosed cabinet
- Ensure vents are not blocked
- Move screen away from windows or direct sunlight if possible
- Reduce base display brightness if consistently hot
- Verify TV's cooling fan is working
- Ensure at least 3-4 other screens remain enabled for master clock/Sonos controller roles
- Contact support if temperature remains above 65°C after adjustments
Cleaning and Care
Screen Cleaning:
- Power off screen before cleaning
- Use microfiber cloth (dry or slightly damp)
- Never spray cleaner directly on screen
- Avoid paper towels or abrasive materials
- Clean weekly or as needed
Device Maintenance:
- Keep device and surrounding area dust-free
- Check cable connections quarterly
- Ensure proper ventilation
- Don't stack items on device
- Protect from moisture and spills
Screen Troubleshooting
Screen Shows "No Signal"
Check:
- HDMI cable is securely connected to both device and TV
- TV is on correct HDMI input channel
- Coaching screen device has power (LED indicator)
- HDMI cable is not damaged
Try:
- Disconnect and reconnect HDMI cable
- Try different HDMI port on TV
- Power cycle coaching screen device
- Test with different HDMI cable if available
Screen Offline in Device Management
Network Connection:
- Check Ethernet cable is connected and secure
- Verify network switch/router is operational
- Test network connection with another device
- Check for facility-wide network outage
Device Status:
- Verify power cable is connected
- Check device LED indicators
- Look for visible damage to device
- Restart device using Device Management
WiFi Issues (if applicable):
- Verify WiFi signal strength at screen location
- Confirm WiFi password hasn't changed
- Check if other WiFi devices are connected
- Consider switching to Ethernet
Content Not Updating
Immediate Checks:
- Verify screen is online in Device Management
- Check that content schedule is active in Coaching Screens module
- Confirm internet connection is stable
- Look for error messages on screen
Restart Screen:
- Use Device Management to restart remotely
- Or power cycle device manually
- Wait 2-3 minutes for full restart
- Verify content loads correctly
Screens Out of Sync
Possible Causes:
- Screens on different networks or VLANs (most common cause)
- Network latency or congestion
- WiFi connection on one or more screens
- Master clock screen offline or restarting
- Network broadcast blocked by router/firewall settings
Solutions:
- Critical: Verify ALL screens are on the same network
- Check IP addresses - should be on same subnet
- Verify no VLANs separating screens
- Screens on different networks CANNOT synchronize
- Primary solution: Ensure all screens use Ethernet (not WiFi)
- Restart all screens simultaneously to force new master clock selection
- Check for network issues affecting specific screen
- Verify router allows local broadcast traffic
- Master clock failover happens automatically when master goes offline
- Resynchronization should occur automatically once network issues resolved
Screen Performance Issues or Lag
Symptoms:
- Screen responds slowly to commands
- Content loads slowly or stutters
- UI feels sluggish
- High CPU usage (check Details tab)
- Device running hot
Reduce CPU Load:
- Enable "Prevent from becoming Master Clock" in Configuration tab
- Master clock service uses significant CPU
- System automatically selects another screen as master
- Requires at least 3 other screens on network
- Enable "Prevent from becoming Sonos Controller" in Configuration tab
- Sonos controller service uses significant CPU
- System automatically selects another screen as controller
- Requires at least 3 other screens on network
Other Solutions:
- Reduce base display brightness if screen overheating
- Improve ventilation around device
- Move screen away from heat sources (windows, direct sunlight)
- Switch from WiFi to Ethernet for better performance
- Restart screen to clear temporary issues
- Check CPU temperature in Details tab (should be below 60°C)
- If consistently hot, consider relocating screen to cooler area
Important: Only disable master clock and Sonos controller services on screens with actual performance issues. Keep at least 3-4 screens enabled for these roles to ensure system functionality.
No Audio Output
Check Audio Settings:
- Verify audio output configuration in screen settings
- TV volume is not muted
- For Sonos: Verify speakers are online and grouped
- For external system: Check facility audio system
HDMI Audio Issues:
- Confirm TV is set to use HDMI audio input
- Check TV audio settings menu
- Some TVs require specific audio output mode
- Try different HDMI port if audio doesn't work
Sonos Not Detected:
- Ensure Sonos devices are on same network
- Sonos speakers must be powered on
- May take few minutes for automatic detection
- Check Sonos app that speakers are functioning
Display Quality Issues
Screen Appears Blurry:
- Verify display resolution matches TV's native resolution
- Check HDMI cable quality (use High Speed HDMI cable)
- Adjust TV's picture settings (sharpness, clarity)
- Ensure content is being delivered at correct resolution
Color Issues:
- Adjust TV's picture settings (brightness, contrast, color)
- Check HDMI cable connection
- Verify TV is in correct picture mode (Standard, not Vivid)
- Some TVs have "PC mode" that may need adjustment
Advanced Configuration
Custom Content Scheduling
Zone-Specific Programming:
- Different content per screen based on location
- Cardio area shows cardio-focused content
- Strength area shows strength training
- Allows targeted programming per zone
Audio Zones
Volume Management:
- Adjust volume per zone
- Scheduled volume changes (louder during peak, quieter during off-peak)
- Quick mute functionality for announcements
Screen Deployment Strategies
Single Large Facility (All Same Network):
- All screens on same network automatically synchronize
- Master clock automatically selected from available screens
- Bell timers and sound effects play in perfect sync across all screens
- Unified timing throughout entire facility
Multiple Workout Areas (Same Network):
- Screens on same network synchronize automatically
- Content may differ per area (based on Equipment Associated)
- Timing synchronized even if showing different content
- All bell timers ring at same time across facility
Multiple Facilities or Separate Networks:
- Screens on different networks will NOT synchronize
- Each network has its own master clock
- Timing will be out of sync between networks
- Only use separate networks if you want independent timing
Master Clock System:
- One screen automatically becomes the master clock
- Master selection is automatic - no configuration needed
- If master screen goes offline, another screen becomes master automatically
- All screens must be on same network to receive master clock broadcasts
- Ethernet connections provide most reliable synchronization
Integration with Other Systems
Sonos Audio System
Automatic Discovery:
Once you have at least 3 coaching screens added to your network, Sonos speakers are automatically discovered:
- No manual device addition in Device Management
- Sonos speakers must be on the same network as coaching screens
- Automatically detected and available for use
- Works with all Sonos models
Configuration and Management:
For complete Sonos documentation including:
- Speaker grouping and zone management
- Volume control
- Synchronization with workout timing
- Speaker placement and optimization
- Troubleshooting
See the Audio Control documentation section (covered separately).
Sonos is managed through the Audio Control interface, not Device Management.
Best Practices
Installation Best Practices
- Always use Ethernet connection unless absolutely impossible
- Mount screens at appropriate height for viewing angle (6-8 feet)
- Test viewing distance before permanent mounting
- Route cables professionally for clean appearance
- Label all cables for easy maintenance
- Document screen locations with facility diagram
- Consider glare from windows and lights when positioning
Content Delivery Best Practices
- Keep content schedule updated in Coaching Screens module
- Test new content before deploying to all screens
- Schedule updates during off-peak hours when possible
- Use welcome screens during downtime
- Verify content synchronization across all screens regularly
- Monitor for playback issues during workouts
Network Best Practices
- Use Ethernet for all screens to ensure reliability
- Dedicate network switch ports for coaching screens
- Implement Quality of Service for screen traffic
- Monitor network bandwidth especially with many screens
- Keep network equipment updated and maintained
- Test failover if using redundant network connections
Audio Best Practices
- Use Sonos for quality audio in larger spaces
- Test audio levels from different positions in workout area
- Prevent audio echo by ensuring only one audio source per zone
- Schedule volume adjustments for different times of day
- Train staff on volume control procedures
Maintenance Best Practices
- Clean screens weekly or as needed
- Check connections monthly
- Test screen identification during regular checks
- Document issues and resolutions
- Keep spare HDMI cables available
- Train staff on basic troubleshooting
- Schedule professional maintenance annually
Performance Optimization
Content Loading Optimization
Network Optimization:
- Ethernet provides fastest content delivery
- Quality of Service ensures priority traffic
- Avoid network congestion during workout hours
Content Caching:
- Frequently-used content cached locally
- Reduces load times
- Provides backup if internet temporarily unavailable
Synchronization Optimization
For Perfect Sync:
- Critical: All screens MUST be on the same network (same subnet/VLAN)
- Use Ethernet on all screens (strongly recommended)
- Connect all screens to same network switch if possible
- Avoid mixing Ethernet and WiFi
- Avoid network segmentation (VLANs, separate subnets) between screens
- Verify router allows local broadcast traffic for master clock system
- Restart all screens together if sync issues occur
- Master clock automatically selected - no configuration needed
Power Management
Energy Saving:
- Screens can sleep during closed hours
- Automatic wake when facility opens
- Reduces power consumption
- Extends screen lifespan
Always-On Mode:
- Screens remain on 24/7
- Faster startup when needed
- May be required for some workout schedules
- More convenient but uses more power
Getting Help
Common Support Requests
For no signal issues: Verify HDMI cable connection and TV input
For sync issues: Ensure all screens use Ethernet connection
For audio problems: Check Sonos detection and network connection
For content issues: Verify content schedule in Coaching Screens module
Resources
Back to Device Management Overview - Main device management documentation
Camera Configuration - Security camera setup
Duress Button Configuration - Safety device setup
Properly configured coaching screens provide members with clear, synchronized workout guidance. Using Ethernet connections and regular maintenance ensures reliable performance and consistent member experience.