Adding New Devices
Adding a device to Performance Hub connects your smart technology to the central management system, enabling monitoring, configuration, and control from anywhere.
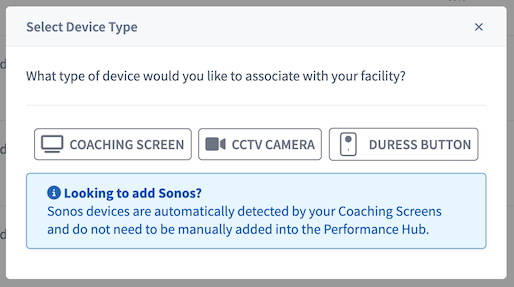
Figure 1: Select Device Type dialog showing options for Coaching Screen, CCTV Camera, and Duress Button
Before You Begin
Network Requirements
For All Devices:
- Strongly recommended: Ethernet connection available
- Stable internet connection at facility
- Network router or switch with available ports
- Power outlet near device location
If Using WiFi (Coaching Screens Only - NOT for Cameras):
- WiFi NOT supported for cameras (PoE Ethernet required)
- WiFi acceptable for coaching screens only
- 5GHz WiFi network available
- Strong signal strength at device location (70%+ minimum)
- WiFi password available
- Ethernet still recommended for coaching screens for reliability
General Best Practices
Always Use Ethernet When Possible:
- Most reliable connection
- No signal dropouts
- Faster data transfer
- Better security
- Lower latency
- No interference issues
Plan Device Locations:
- Consider Ethernet cable routing
- Verify power outlet availability
- Check mounting requirements
- Ensure proper ventilation for cameras and screens
- Verify Bluetooth coverage for duress buttons
Have Information Ready:
- Device name and location
- Room or area assignment
- Network details (if using WiFi)
- Mounting hardware if needed
Adding Devices: Step-by-Step
Step 1: Access Device Management
- Navigate to Main Menu → Smart Technology → Device Management
- Click the "Add New Device +" button at the top of the page
- Device type selection dialog appears
Step 2: Select Device Type
Choose the appropriate device type from the dialog:
Coaching Screen
- Digital displays for workout content
- Shows training routines, timing, and guidance
- Connects via Ethernet or WiFi
CCTV Camera
- Security cameras for monitoring and recording
- AI-powered features for face detection and behavior analysis
- Requires continuous network connection
Duress Button
- Emergency safety devices for staff protection
- Wireless Bluetooth mesh connectivity
- Battery powered for portability
Step 3: Scan QR Code or Enter Serial Number
All devices require scanning a QR code or entering a serial number to add them to Performance Hub.
You have two options:
Option 1: Scan QR Code First (Recommended)
- Use your phone or device camera to scan the QR code on the device
- Opens Performance Hub "Add Device" dialog automatically
- Serial number is pre-filled
- Quick and error-free
Option 2: Open Add Device Dialog First
- Click "Add New Device +" and select device type
- Click "Scan QR Code With Camera" in the dialog
- Scan the QR code on the device
- Serial number is automatically filled in
Option 3: Manual Entry
- Open Add Device dialog and select device type
- Manually type the serial number from the device label
- Use this if QR code is damaged or scanner not available
Step 4: Follow Device-Specific Setup
After scanning QR code or entering serial number, complete device-specific setup:
Quick Setup Guides
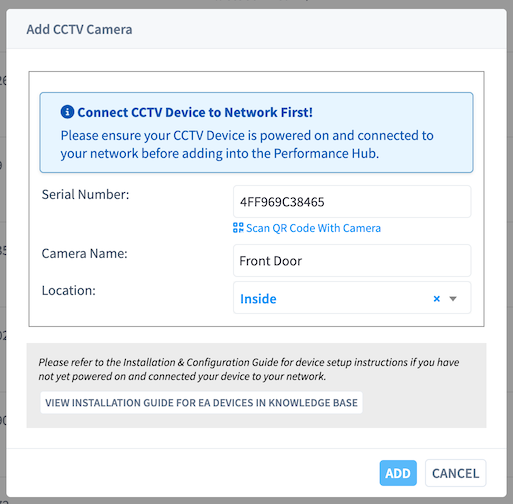
Adding a CCTV Camera (Quick Reference)
- Physical installation:
- Mount camera in desired location
- Connect Ethernet cable (strongly recommended)
- Connect power
- Scan QR code:
- QR code location: On the side of the camera (physical sticker)
- Use phone camera to scan QR code
- Opens "Add Device" dialog with serial number pre-filled
- OR open Add Device dialog first, select Camera, click "Scan QR Code With Camera"
- OR manually type serial number from camera label
- Enter camera details:
- Camera name (descriptive, includes location)
- Location/room assignment
- Indoor or outdoor designation
- Click "Add" - Camera appears in Device Management when connected (2-3 minutes)
- Configure camera settings:
- Recording mode (continuous recommended)
- Motion detection zones and threshold
- Image settings (brightness, contrast, etc.)
- Storage monitoring
Network Connection:
- Required: Power over Ethernet (PoE) - WiFi is NOT supported for cameras
- Camera receives both power and network through single Ethernet cable
- Requires PoE-capable network switch or PoE injector
- Cameras do not have separate power adapter - powered via PoE only
See Camera Configuration for complete details
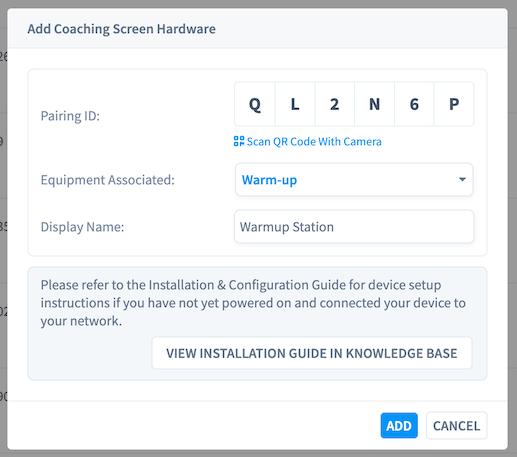
Adding a Coaching Screen (Quick Reference)
- Physical installation:
- Mount TV/display
- Connect coaching screen device to TV via HDMI
- Connect Ethernet to coaching screen device (strongly recommended)
- Connect power
- Wait for QR code to appear:
- QR code location: Automatically displayed on the screen once device is ready
- Takes 1-2 minutes for QR code to appear on screen
- Scan QR code:
- Use phone camera to scan QR code displayed on screen
- Opens "Add Device" dialog with pairing ID pre-filled
- OR open Add Device dialog first, select Coaching Screen, click "Scan QR Code With Camera"
- OR manually type pairing ID from screen display
- Enter screen details:
- Screen name (location-based: "Main Room Screen")
- Room or area assignment
- Equipment number (automatically assigned)
- Click "Add" - Screen status shows "Online" in Device Management
- Configure screen settings:
- Content scheduling
- Audio output (Sonos, HDMI, external)
- Screen synchronization if multiple screens
Network Connection Priority:
- Best: Ethernet connection for reliability and sync
- Acceptable: 5GHz WiFi with excellent signal (80%+)
- Avoid: WiFi if using multi-screen synchronization
See Screen Configuration for complete details
Adding a Duress Button (Quick Reference)

- Scan QR code:
- QR code location: On the back of the physical device OR on the box it came in
- Use phone camera to scan QR code
- Opens "Add Device" dialog with serial number pre-filled
- OR open Add Device dialog first, select Duress Button, click "Scan QR Code With Camera"
- OR manually type serial number from device label
- Enter button details:
- Button location (specific area: "Front Desk", "PT Office")
- Alert recipients configuration
- Verify Bluetooth coverage:
- Test signal strength at intended location
- Ensure within range of Bluetooth mesh gateway (typically 30-50 feet)
- Physical placement:
- Choose accessible location for staff
- Discrete placement to avoid member questions
- Secure placement to prevent loss
- Pairing process:
- Press and hold button pairing button
- Button flashes to indicate pairing mode
- Appears in Device Management when paired (30-60 seconds)
- Test functionality:
- Press button to send test alert
- Verify alert received by designated responders
- Confirm location information is correct
- Test again after 24 hours
- Document and train:
- Add to facility safety diagram
- Train all staff on button location and use
Network Connection:
- Uses Bluetooth mesh (wireless by design)
- No Ethernet or WiFi configuration needed
- Automatic connection to nearest gateway
See Duress Button Configuration for complete details
QR Code Scanning Details
Where to Find QR Codes
CCTV Cameras:
- Location: Physical sticker on the side of the camera
- Contains camera serial number
- Scan with phone camera or from Add Device dialog
- If sticker damaged, serial number also printed on camera label
Coaching Screens:
- Location: Automatically displayed on the screen itself
- Appears 1-2 minutes after device powers on and connects to network
- Shows pairing ID for device registration
- Remains on screen until device is added to Performance Hub
Duress Buttons:
- Location: On the back of the physical device
- Also available: On the box the device came in
- Contains device serial number
- Keep packaging if button QR code becomes damaged
Scanning Methods
Method 1: Scan QR Code First (Fastest)
- Power on and connect device to network
- Use phone or tablet camera to scan QR code
- Performance Hub "Add Device" dialog opens automatically
- Serial number or pairing ID is pre-filled
- Enter device name and location
- Click "Add"
Method 2: Scan from Add Device Dialog
- In Device Management, click "Add New Device +"
- Select device type (Camera, Screen, or Duress Button)
- Click "Scan QR Code With Camera" button
- Allow camera access when prompted
- Point at QR code on device
- Serial number automatically filled in
- Complete device details and click "Add"
Method 3: Manual Entry (Backup)
- Open Add Device dialog and select device type
- Manually type serial number or pairing ID
- Use this if:
- QR code is damaged or unreadable
- Scanner not working properly
- Camera access not available
- Double-check serial number for accuracy
Devices Appearing in Device Management
After Adding Device:
Cameras:
- Appear in Device Management within 2-3 minutes
- Must be powered on and connected to network
- Status shows "Online" when ready
- If doesn't appear after 5 minutes, check power and network connection
Coaching Screens:
- Appear in Device Management immediately after adding
- Must be powered on with HDMI connected to TV
- Status shows "Online" when ready
- Screen displays content or setup screen
Duress Buttons:
- Must complete pairing process after adding
- Press and hold pairing button on device
- Button flashes to indicate pairing mode
- Appears online when paired (30-60 seconds)
- Must be within Bluetooth mesh range
Troubleshooting QR Code Scanning
QR Code Won't Scan:
- Ensure QR code is clean and undamaged
- Try better lighting on QR code
- Hold phone camera steady for 2-3 seconds
- Try different distance from QR code (4-8 inches typically optimal)
- Use manual entry if QR code damaged
Scanner Not Opening:
- Check browser camera permissions enabled
- Try refreshing the page
- Use different browser if needed
- Use phone camera to scan QR code directly instead
Wrong Device Added:
- Remove device from Device Management
- Verify you scanned correct QR code
- Check you selected correct device type
- Re-scan or manually enter correct serial number
Device Doesn't Appear After Adding:
- Wait full 5 minutes before troubleshooting
- Verify device has power (LED indicators on)
- Check network connection (Ethernet or WiFi)
- For duress buttons: complete pairing process
- Try removing and re-adding device
Special Cases
Sonos Audio Devices
Important: Sonos speakers do not need to be manually added to Device Management.
Automatic Detection:
- Sonos devices automatically detected by Coaching Screens
- No configuration required
- Works when Sonos is on same network
- May take a few minutes after Sonos powers on
If Sonos Not Detected:
- Verify Sonos is on same network as coaching screens
- Ensure Sonos is powered on and functional
- Check Sonos app to confirm device is working
- Restart coaching screen to re-detect Sonos
- Allow 5 minutes for automatic detection
Using Sonos with Screens:
- Configure audio output in screen settings
- Assign Sonos speakers to specific screens
- Volume controlled through coaching screen interface
- See Screen Configuration for details
Replacing Existing Devices
When Replacing Failed Device:
- Remove old device from Device Management
- Document old device settings (name, location, configuration)
- Add new device using normal process
- Apply same configuration as old device
- Update any integrations that referenced old device
- Test thoroughly before considering replacement complete
For Cameras:
- Reuse same mounting location
- Keep same camera name for continuity
- Verify recording history is preserved
- Test motion detection zones still appropriate
For Screens:
- Reuse same TV and mounting
- Keep same screen name
- Verify content scheduling unchanged
- Test multi-screen sync if applicable
For Duress Buttons:
- Place in exact same location
- Keep same location name
- Test alert delivery immediately
- Inform staff of serial number change
Adding Multiple Devices
For Multiple Devices of Same Type:
- Plan device layout before starting
- Prepare all network connections in advance
- Add devices one at a time in Performance Hub
- Label network cables for easy identification
- Test each device before moving to next
- Document device locations on facility diagram
Best Practice:
- Don't try to add all devices simultaneously
- Allow each device to fully connect before adding next
- Use consistent naming convention
- Test functionality of each device individually first
Temporary Devices
For Events or Testing:
Cameras and Screens:
- Add normally to Device Management
- Configure with temporary names indicating duration
- Remove from Device Management when event ends
- Can be re-added later with same process
Duress Buttons:
- Add as normal device
- Configure with temporary location
- Important: Inform staff of temporary button location
- Remove or reassign when temporary need ends
Troubleshooting Device Addition
Device Won't Connect
Check Network Connection:
- Ethernet cable securely connected both ends
- Network switch has link light for port
- Try different network cable if available
- Verify network switch/router is working
Check Power:
- Device has power (LED indicators on)
- Power cable fully inserted
- Test power outlet with another device
- Try different power cable if available
Check WiFi (if applicable):
- Correct WiFi password entered
- 5GHz network selected (not 2.4GHz)
- Signal strength adequate at location
- Other devices can connect to same WiFi
Device Appears Then Goes Offline
Possible Causes:
- Intermittent network connection
- WiFi signal too weak
- Power supply issue
- Network conflict (IP address)
Solutions:
- Primary solution: Switch from WiFi to Ethernet
- Check network cable for damage
- Verify adequate power supply
- Restart network switch/router
- Contact support if persists
Wrong Device Appears
If Detecting Wrong Device:
- May be detecting device from nearby facility
- Verify device serial number matches physical device
- Check device is on correct network
- Ensure network is properly isolated
- Remove incorrect device and add correct one
Pairing Fails (Duress Buttons)
Troubleshooting Pairing:
- Verify button battery is fresh
- Check Bluetooth mesh gateway is online
- Move button closer to gateway temporarily
- Try pairing process again
- Replace button battery if old
- Contact support if button won't pair
After Adding Devices
Immediate Next Steps
For All Devices:
- Verify device is online in Device Management
- Configure basic settings (name, location properly set)
- Test device functionality immediately
- Document device information (serial number, location)
Device-Specific:
- Cameras: Verify recording is working
- Screens: Confirm content is displaying
- Duress Buttons: Test alert delivery
First 24 Hours
Monitor New Devices:
- Check device remains online
- Verify no connectivity issues
- Monitor temperature readings (cameras, screens)
- Test duress buttons again after 24 hours
Configuration Fine-Tuning:
- Adjust camera angles if needed
- Optimize screen brightness
- Verify duress button signal strength
- Make any needed configuration changes
Documentation
Maintain Device Records:
- Device serial number
- Installation date
- Location details
- Configuration notes
- Any issues encountered during setup
Update Facility Documentation:
- Add device to facility diagram
- Update equipment inventory
- Include in staff training materials (especially duress buttons)
- Note any special configuration
Best Practices
Planning Before Installation
- Survey installation locations before purchasing devices
- Verify network infrastructure can support new devices
- Plan cable routing for clean, professional installation
- Consider future expansion when planning locations
- Coordinate with IT team if on shared network
During Installation
- Use Ethernet connections whenever physically possible
- Label all cables immediately during installation
- Test as you go - verify each device before moving to next
- Take photos of installations for documentation
- Keep installation neat - proper cable management
After Installation
- Test all devices thoroughly within first 24 hours
- Monitor for issues during first week
- Train staff on new device locations and use
- Update documentation with device details
- Schedule regular maintenance on calendar
Common Mistakes to Avoid
Don't:
- Add multiple devices without testing each one first
- Use WiFi when Ethernet is available
- Skip device testing after installation
- Forget to document device locations
- Neglect to train staff on new safety devices
Do:
- Plan thoroughly before starting
- Use Ethernet for all cameras and screens
- Test each device immediately after adding
- Document everything
- Train staff properly on duress button locations
Getting Help
If You Need Assistance
Device Not Appearing:
- Wait full 5 minutes before troubleshooting
- Check all physical connections
- See troubleshooting section above
- Contact support if device still not detected
Configuration Questions:
- Refer to device-specific configuration pages
- Check Knowledge Base for setup guides
- Contact support for complex configurations
Hardware Issues:
- Verify device has power and connectivity
- Check for physical damage
- Contact support for defective devices
- Keep purchase information for warranty claims
Resources
Back to Device Management Overview - Main device management page
Device Configuration Guides:
Device Management Actions - Update, restart, identify, and router access
Successfully adding devices is the first step to a fully integrated smart facility. Use Ethernet connections, test thoroughly, and document everything for best results.