CCTV Camera Configuration
Complete guide to setting up, configuring, and managing security cameras in your facility.
Camera Overview
Security cameras provide continuous video monitoring, recording, and AI-powered analytics for your facility. Cameras connect to your network and stream video to the Performance Hub system for viewing, recording, and analysis.
Key Capabilities:
- 24/7 continuous recording
- Motion detection and alerts
- AI-powered face detection and recognition
- Behavior analysis and anomaly detection
- Remote viewing from anywhere
- Automatic video retention management
- Integration with access control systems
Adding a New Camera
Before You Begin
Network Requirements:
- Required: Ethernet connection with Power over Ethernet (PoE)
- WiFi is NOT supported for cameras
- Adequate internet bandwidth (2-4 Mbps per camera minimum)
- PoE-capable network switch or PoE injector
Physical Requirements:
- Mounting location with clear view of desired area
- Avoid direct sunlight on camera lens
- Weatherproof mounting for outdoor cameras
- Adequate ventilation for heat dissipation
Installation Steps
-
Physical Installation:
- Mount camera in desired location
- Connect PoE Ethernet cable to PoE-capable network switch
- Camera receives power and network through single Ethernet cable
- Wait for camera to power on (LED indicators active)
-
Scan QR Code to Add Camera:
QR Code Location: Physical sticker on the side of the camera
Three Ways to Add:
Option A: Scan QR Code First (Fastest)
- Use phone camera to scan QR code on camera
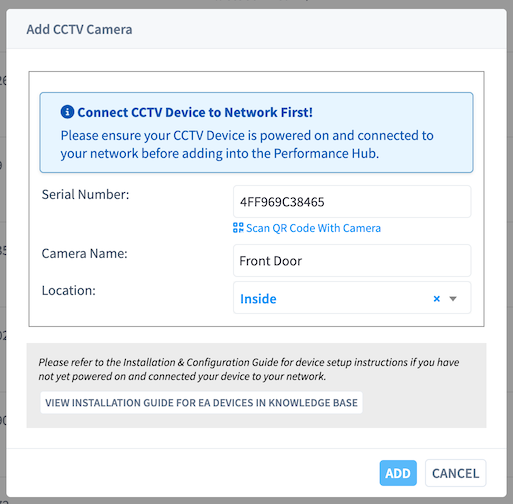
- Performance Hub "Add CCTV Camera" dialog opens automatically
- Serial number is pre-filled
Option B: Scan from Add Device Dialog
- Click "Add New Device +" in Device Management
- Select "CCTV Camera"
- Click "Scan QR Code With Camera"
- Point camera at QR code on device
- Serial number automatically filled in
Option C: Manual Entry
- Click "Add New Device +" in Device Management
- Select "CCTV Camera"
- Manually type serial number from camera label
- Use if QR code is damaged
-
Enter Camera Details:
- Camera name (descriptive, includes location: "Front Door Camera")
- Location/room assignment
- Indoor or outdoor designation
- Click "Add"
-
Camera Appears in Device Management:
- Camera appears in device list within 2-3 minutes
- Status shows "Online" when ready
- Camera begins recording automatically
-
Configure Camera Settings (detailed below)
Camera Configuration Settings
Basic Settings
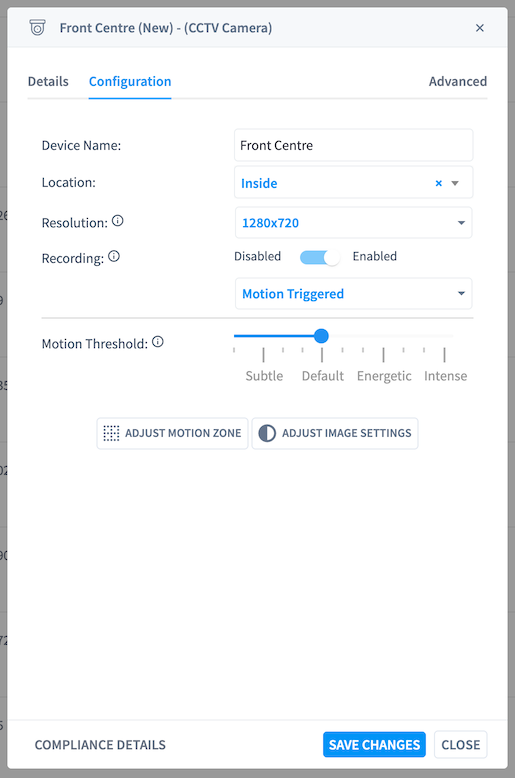
Camera Name
- Use descriptive names including location and view angle
- Examples: "Front Door Camera", "Parking Lot - North Side", "Reception Desk View"
- Keep names consistent across all cameras
Location Assignment
- Assign camera to specific room or area
- Helps organize cameras in CCTV viewing interface
- Allows filtering cameras by location
- Important for access control integration
Camera Position
- Indoor or Outdoor
- Specific mounting location (ceiling, wall, corner)
- Height above ground
- View direction and coverage area
Recording Configuration
Recording Mode:
Continuous Recording (Recommended)
- Camera records 24/7 non-stop
- Best for security and comprehensive coverage
- Automatic overwrite when storage is full
- Most reliable for incident investigation
Motion-Activated Recording
- Camera records only when motion is detected
- Saves storage space
- May miss events if motion detection misconfigured
- Best for low-activity areas
Scheduled Recording
- Record during specific hours only
- Useful for areas only used during business hours
- Configure time windows based on facility operations
- Reduces storage usage
Recording Quality:
High Quality - 1080p or higher
- Clear detailed footage
- Better for face recognition and identification
- Higher storage requirements
- Recommended for entry points and high-security areas
Medium Quality - 720p
- Balance between quality and storage
- Suitable for general monitoring
- Most common setting
Low Quality - 480p or lower
- Minimal storage usage
- May not capture fine details
- Only for low-priority areas
Motion Detection
Motion Threshold Slider:
Adjust how sensitive the camera is to motion using the slider with four preset levels:
-
Subtle: Very sensitive - detects small movements and minor changes
- Best for: Low-activity areas where any movement is significant
- May produce more alerts
-
Default: Balanced sensitivity (recommended for most installations)
- Best for: General monitoring areas
- Good balance between catching events and avoiding false alerts
-
Energetic: Moderate sensitivity - detects clear, deliberate movement
- Best for: Moderately active areas
- Reduces false alerts from minor movements
-
Intense: Low sensitivity - only detects significant movement
- Best for: High-traffic areas where only major events matter
- Minimizes false alerts in busy environments
Adjusting Motion Zones:
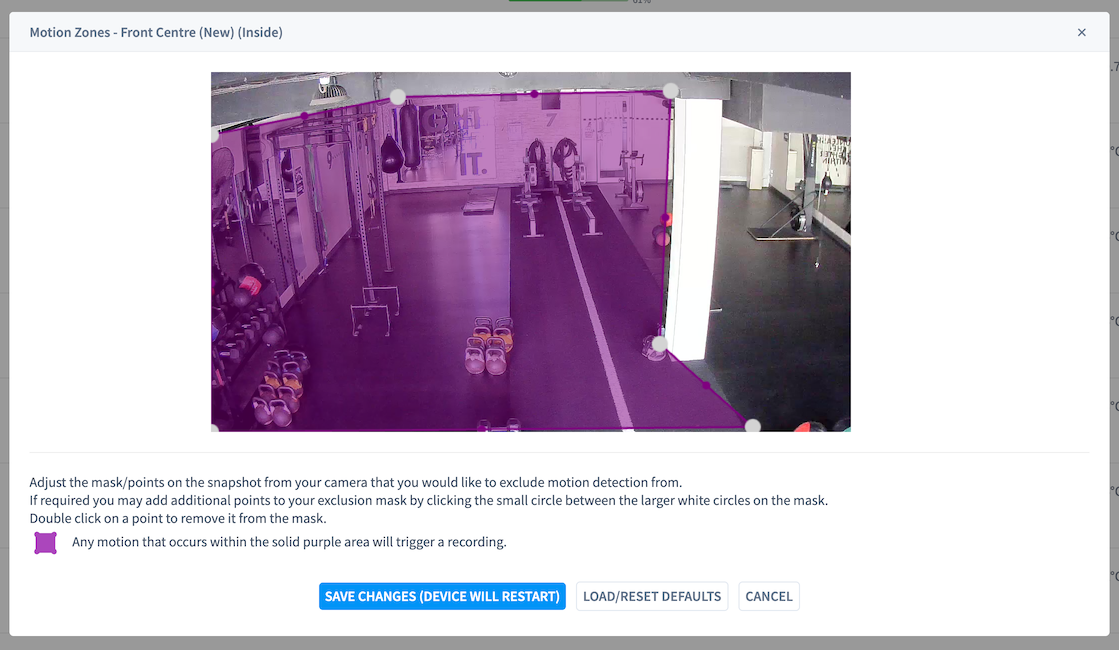
Click "Adjust Motion Zone" to define specific areas for motion detection:
- Purple overlay shows areas where motion WILL trigger recording
- White/clear areas are excluded from motion detection
- Add points by clicking between existing points on the mask
- Remove points by double-clicking on a point
- Use to ignore:
- Areas with constant movement (trees, flags, busy streets, screens/monitors)
- Public areas outside your property
- Areas where you don't need monitoring
- Focus detection on:
- Entry and exit points
- High-value areas
- Specific pathways or zones of interest
Image Settings
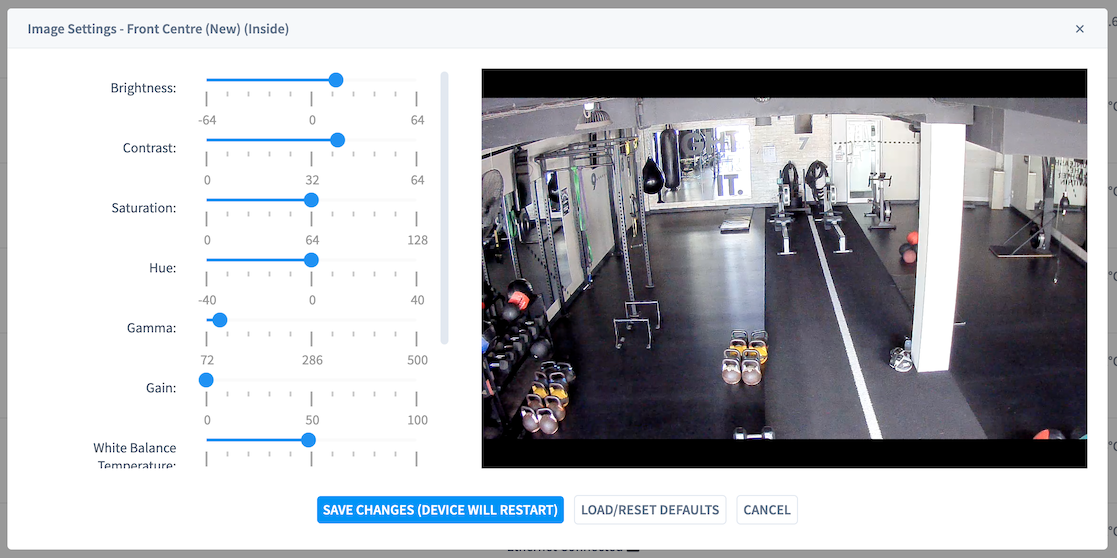
Adjust Image Settings:
Click "Adjust Image Settings" to fine-tune camera image quality with live preview:
Brightness (-64 to +64)
- Adjusts overall image brightness
- Increase for darker environments
- Decrease if image appears washed out
Contrast (0 to 64)
- Controls difference between light and dark areas
- Higher contrast makes details more distinct
- Lower contrast for softer image
Saturation (0 to 128)
- Controls color intensity
- Higher values produce more vibrant colors
- Lower values produce more muted, grayscale-like appearance
Hue (-40 to +40)
- Shifts color tones in image
- Adjust if colors appear incorrect
- Usually left at default (0)
Gamma (72 to 500)
- Controls midtone brightness
- Lower values brighten shadows
- Higher values darken midtones
Gain (0 to 100)
- Amplifies image sensor signal
- Higher gain brightens low-light images
- May introduce noise/grain at high values
White Balance Temperature
- Adjusts color temperature
- Compensates for different lighting conditions
- Auto mode typically works well
Using Image Settings:
- Adjust settings while viewing live camera feed
- Changes apply in real-time for immediate feedback
- Click "Save Changes (Device Will Restart)" to apply permanently
- Click "Load/Reset Defaults" to return to factory settings
- Camera restarts briefly after saving changes
Network Settings
Connection Type: Power over Ethernet (PoE) Only
Cameras require PoE Ethernet connection and do not support WiFi:
Why PoE Only:
- Reliable continuous connection required for recording
- Single cable provides both power and network
- Eliminates need for separate power adapter
- No signal dropouts or interference
- Consistent bandwidth for high-quality recording
- Lower latency for live viewing
Network Configuration:
- IP Address: Automatically assigned (DHCP)
- Subnet mask and gateway: Configured automatically
- DNS servers: Use facility network DNS
- Port forwarding: Not required (handled by Performance Hub)
PoE Requirements:
- PoE-capable network switch (802.3af or 802.3at)
- OR PoE injector if switch doesn't support PoE
- Cat5e or Cat6 Ethernet cable
- Maximum cable length: 100 meters (328 feet)
Bandwidth Management:
- Each camera uses 2-4 Mbps continuously
- Multiple cameras require significant bandwidth
- Configure Quality of Service settings on network equipment
- Monitor internet speed regularly
- Plan network capacity for total number of cameras
Storage Management
Internal Storage:
- All cameras include 128GB high-endurance EMMC internal storage
- No SD card slot - storage is built into the camera
- High-endurance design for continuous recording
- Provides local buffer for recordings
Automatic Upload to Performance Hub:
- Recordings automatically upload from camera to Performance Hub
- Upload happens continuously in the background
- Uses configured region/endpoint for your organization
- No manual upload or management required
- Recordings accessible from Performance Hub immediately after upload
How Storage Works:
- Camera records to internal 128GB EMMC storage
- Recordings automatically upload to Performance Hub
- Once uploaded, local storage can be recycled
- Automatic management - no user intervention needed
Local Storage Management:
- Internal storage automatically managed by camera
- Oldest recordings overwritten when space needed
- Ensure reliable network connection for timely uploads
- Camera continues recording even if upload temporarily interrupted
Performance Hub Storage:
- Primary long-term storage location
- Capacity determined by your subscription
- Automatic retention management
- Accessible from anywhere with internet connection
- Retention period configured by organizational administrator
Storage Monitoring:
- View storage usage in Device Management
- Displayed as "Activity Down/Up" in device list
- "Activity Up" shows data uploaded to Performance Hub
- Monitor upload status to ensure recordings transferring correctly
Purge Internal Storage:
- Available in Advanced tab → Storage
- Manually clears camera's internal storage if needed
- Use if troubleshooting storage issues
- Recordings already uploaded to Performance Hub are preserved
Camera Placement Guidelines
Entry Points (High Priority):
- Front door, back door, side entrances
- Loading docks and delivery areas
- Emergency exits
- Position to capture faces at eye level
Interior Areas:
- Reception desk from multiple angles
- Hallways and corridors
- Workout areas (for safety and behavior analysis)
- Equipment storage areas
- Staff-only areas
Exterior Areas:
- Parking lots with clear vehicle views
- Building perimeter
- Dumpster and service areas
- Outdoor equipment or storage
Avoid:
- Direct sunlight in camera lens
- Areas with extreme temperature fluctuations
- Locations without network cable access (beyond 100 meter PoE limit)
- Private areas (restrooms, changing rooms)
Camera Maintenance
Regular Checks
Weekly:
- Verify camera is online
- Check recording status
- Review temperature readings
- Test live view functionality
Monthly:
- Clean camera lens (use microfiber cloth)
- Check camera mounting security
- Verify recording quality
- Review motion detection accuracy
- Test night vision (if equipped)
Quarterly:
- Check all cable connections
- Inspect weatherproofing (outdoor cameras)
- Clean housing and vents
- Verify camera positioning hasn't shifted
- Update firmware (automatic at 2 AM)
Temperature Management
Normal Operating Temperature:
- 40-70°C depending on environment and activity
- Higher temperatures during AI processing
- Outdoor cameras may run hotter in direct sun
Cooling Considerations:
- Ensure air vents are not blocked
- Verify cooling fan is operational (if equipped)
- Provide shade for outdoor cameras in hot climates
- Consider relocating if consistently above 75°C
High Temperature Troubleshooting:
- Check that vents are clear of dust/debris
- Reduce recording quality to decrease processing load
- Disable AI features temporarily if overheating persists
- Contact support for fan replacement if needed
Storage Capacity Management
Monitor Usage:
- Check "Activity Down/Up" column in device list
- Shows current storage used vs. available
- Alerts appear when approaching capacity
Optimize Storage:
- Use motion-activated recording for low-activity areas
- Reduce recording quality for less critical cameras
- Adjust retention settings if storage is constrained
- Archive important footage to external storage
Storage Alerts:
- Red indicator when storage is >90% full
- Automatic cleanup of oldest footage begins
- Consider upgrading storage capacity if frequently full
Camera Troubleshooting
Camera Offline
Immediate Checks:
- Verify power connection
- Check network cable is securely connected
- Test power outlet with another device
- Look for physical damage to camera or cables
Network Troubleshooting:
- Confirm other devices on network are online
- Restart network switch if multiple devices offline
- Check for network outage at facility
- Verify PoE switch is providing power to camera port
Camera Restart:
- Use "Device Management" to restart remotely
- Or power cycle camera manually
- Wait 2-3 minutes for full restart
- Check if camera reappears online
Poor Video Quality
Check:
- Camera lens is clean (no smudges, dust, or condensation)
- Recording quality setting is appropriate for use case
- Adequate lighting in camera view area
- Camera is in focus (some cameras have adjustable focus)
Improve Quality:
- Increase recording quality setting
- Add supplemental lighting in dark areas
- Clean lens with microfipher cloth
- Adjust camera angle to avoid backlight
- For night vision: ensure IR illuminators are working
Motion Detection Not Working
Possible Causes:
- Motion sensitivity set too low
- Motion zones configured incorrectly
- Object detection filtering out human motion
- Camera view obstructed
Solutions:
- Increase motion sensitivity
- Reconfigure motion zones to include areas of interest
- Test motion detection with deliberate movement
- Review alert history to check if alerts are being generated but not delivered
Recording Gaps
Possible Causes:
- Network connectivity issues
- Insufficient bandwidth
- Camera overheating and throttling
- Storage capacity full
Solutions:
- Verify PoE Ethernet connection is stable
- Reduce recording quality to decrease bandwidth usage
- Check camera temperature and improve cooling
- Verify storage capacity is adequate
- Check for network issues during gap times
- Test with different Ethernet cable if connectivity intermittent
Advanced Configuration
Multi-Camera Synchronization
Camera Groups:
- Group cameras by area or purpose
- View multiple cameras simultaneously in CCTV interface
- Synchronized playback for incident investigation
- Coordinated motion detection alerts
Camera Tours:
- Configure automatic cycling through camera views
- Useful for monitoring station displays
- Set dwell time for each camera
- Organize tours by facility area
Privacy Settings
Privacy Masking:
- Block out specific areas in camera view
- Protects sensitive areas (computer screens, whiteboards)
- Masked areas are never recorded
- Configure masks in CCTV & AI module
Access Restrictions:
- Control who can view specific cameras
- Set permissions by user role
- Restrict access to sensitive areas
- Audit log tracks all camera access
Best Practices
Installation Best Practices
- Always use Ethernet connections unless physically impossible
- Mount cameras at appropriate height (7-9 feet for face capture)
- Angle cameras slightly downward to capture faces
- Avoid backlighting (cameras pointed at windows/bright lights)
- Test camera view before permanent mounting
- Document camera locations with diagrams
- Label cables for easy identification during maintenance
Recording Best Practices
- Use continuous recording for entry points and high-security areas
- Configure motion zones to reduce false alerts
- Monitor storage usage weekly
- Test recording playback monthly
- Mark critical footage for retention before automatic deletion
- Maintain adequate internet bandwidth for number of cameras
Security Best Practices
- Change default camera passwords immediately
- Use network segmentation for camera traffic if possible
- Keep firmware updated (automatic at 2 AM)
- Restrict camera access to authorized personnel only
- Disable unused camera features to reduce attack surface
- Monitor for unauthorized access in audit logs
- Physical security: Ensure cameras cannot be easily tampered with
Maintenance Best Practices
- Clean camera lenses monthly or as needed
- Check all connections quarterly
- Test each camera during regular facility inspections
- Document all maintenance activities
- Replace aging cameras proactively before failure
- Keep spare cameras for critical locations
- Train staff on basic camera troubleshooting
Performance Optimization
Bandwidth Optimization
For Multiple Cameras:
- All cameras use PoE Ethernet (no WiFi congestion issues)
- Implement Quality of Service on network equipment to prioritize camera traffic
- Schedule non-critical tasks outside business hours
- Monitor bandwidth usage during peak times
- Consider separate internet connection for cameras if many cameras installed
- Use managed PoE switches for better traffic management
Recording Quality Optimization:
- High quality for entry points and registers
- Medium quality for general monitoring areas
- Lower quality for long-range parking lot views
- Adjust based on available bandwidth and storage
Processing Optimization
AI Feature Management:
- Enable only needed AI features per camera
- Face recognition may not be needed on all cameras
- Behavior analysis best for entry/exit points
- Monitor camera temperature when using AI features
Schedule Intensive Operations:
- Face database updates during off-hours
- Archive footage during low-bandwidth periods
- Firmware updates at 2 AM automatically
Getting Help
Common Support Requests
For image quality issues: Verify recording quality settings and lens cleanliness
For connectivity issues: Check network connection type and signal strength
For AI feature problems: Confirm camera has AI accelerator chip
For hardware failures: Contact support for replacement coordination
Resources
Back to Device Management Overview - Main device management documentation
Screen Configuration - Coaching screen setup
Duress Button Configuration - Safety device setup
Properly configured cameras provide reliable security monitoring and valuable insights into facility operations. Regular maintenance and using Ethernet connections ensures optimal performance and recording reliability.