Marketing & Print
Marketing & Print is your centralized hub for accessing professionally designed marketing materials and facility signage. Your organizational administrator creates and configures design templates that you can customize and export for printing or digital use.
Quick Reference
Where to find it: Main Menu → (locate Marketing & Print in your organization's menu structure)
Who can access: Users with the Marketing & Print module enabled
Purpose: Access, customize, and export marketing materials and facility signage
Overview
What You'll See
The Marketing & Print interface organizes your organization's design assets into folders, making it easy to find the specific template you need. The interface includes multiple tabs for different types of content, and a search feature to quickly locate designs across all folders.
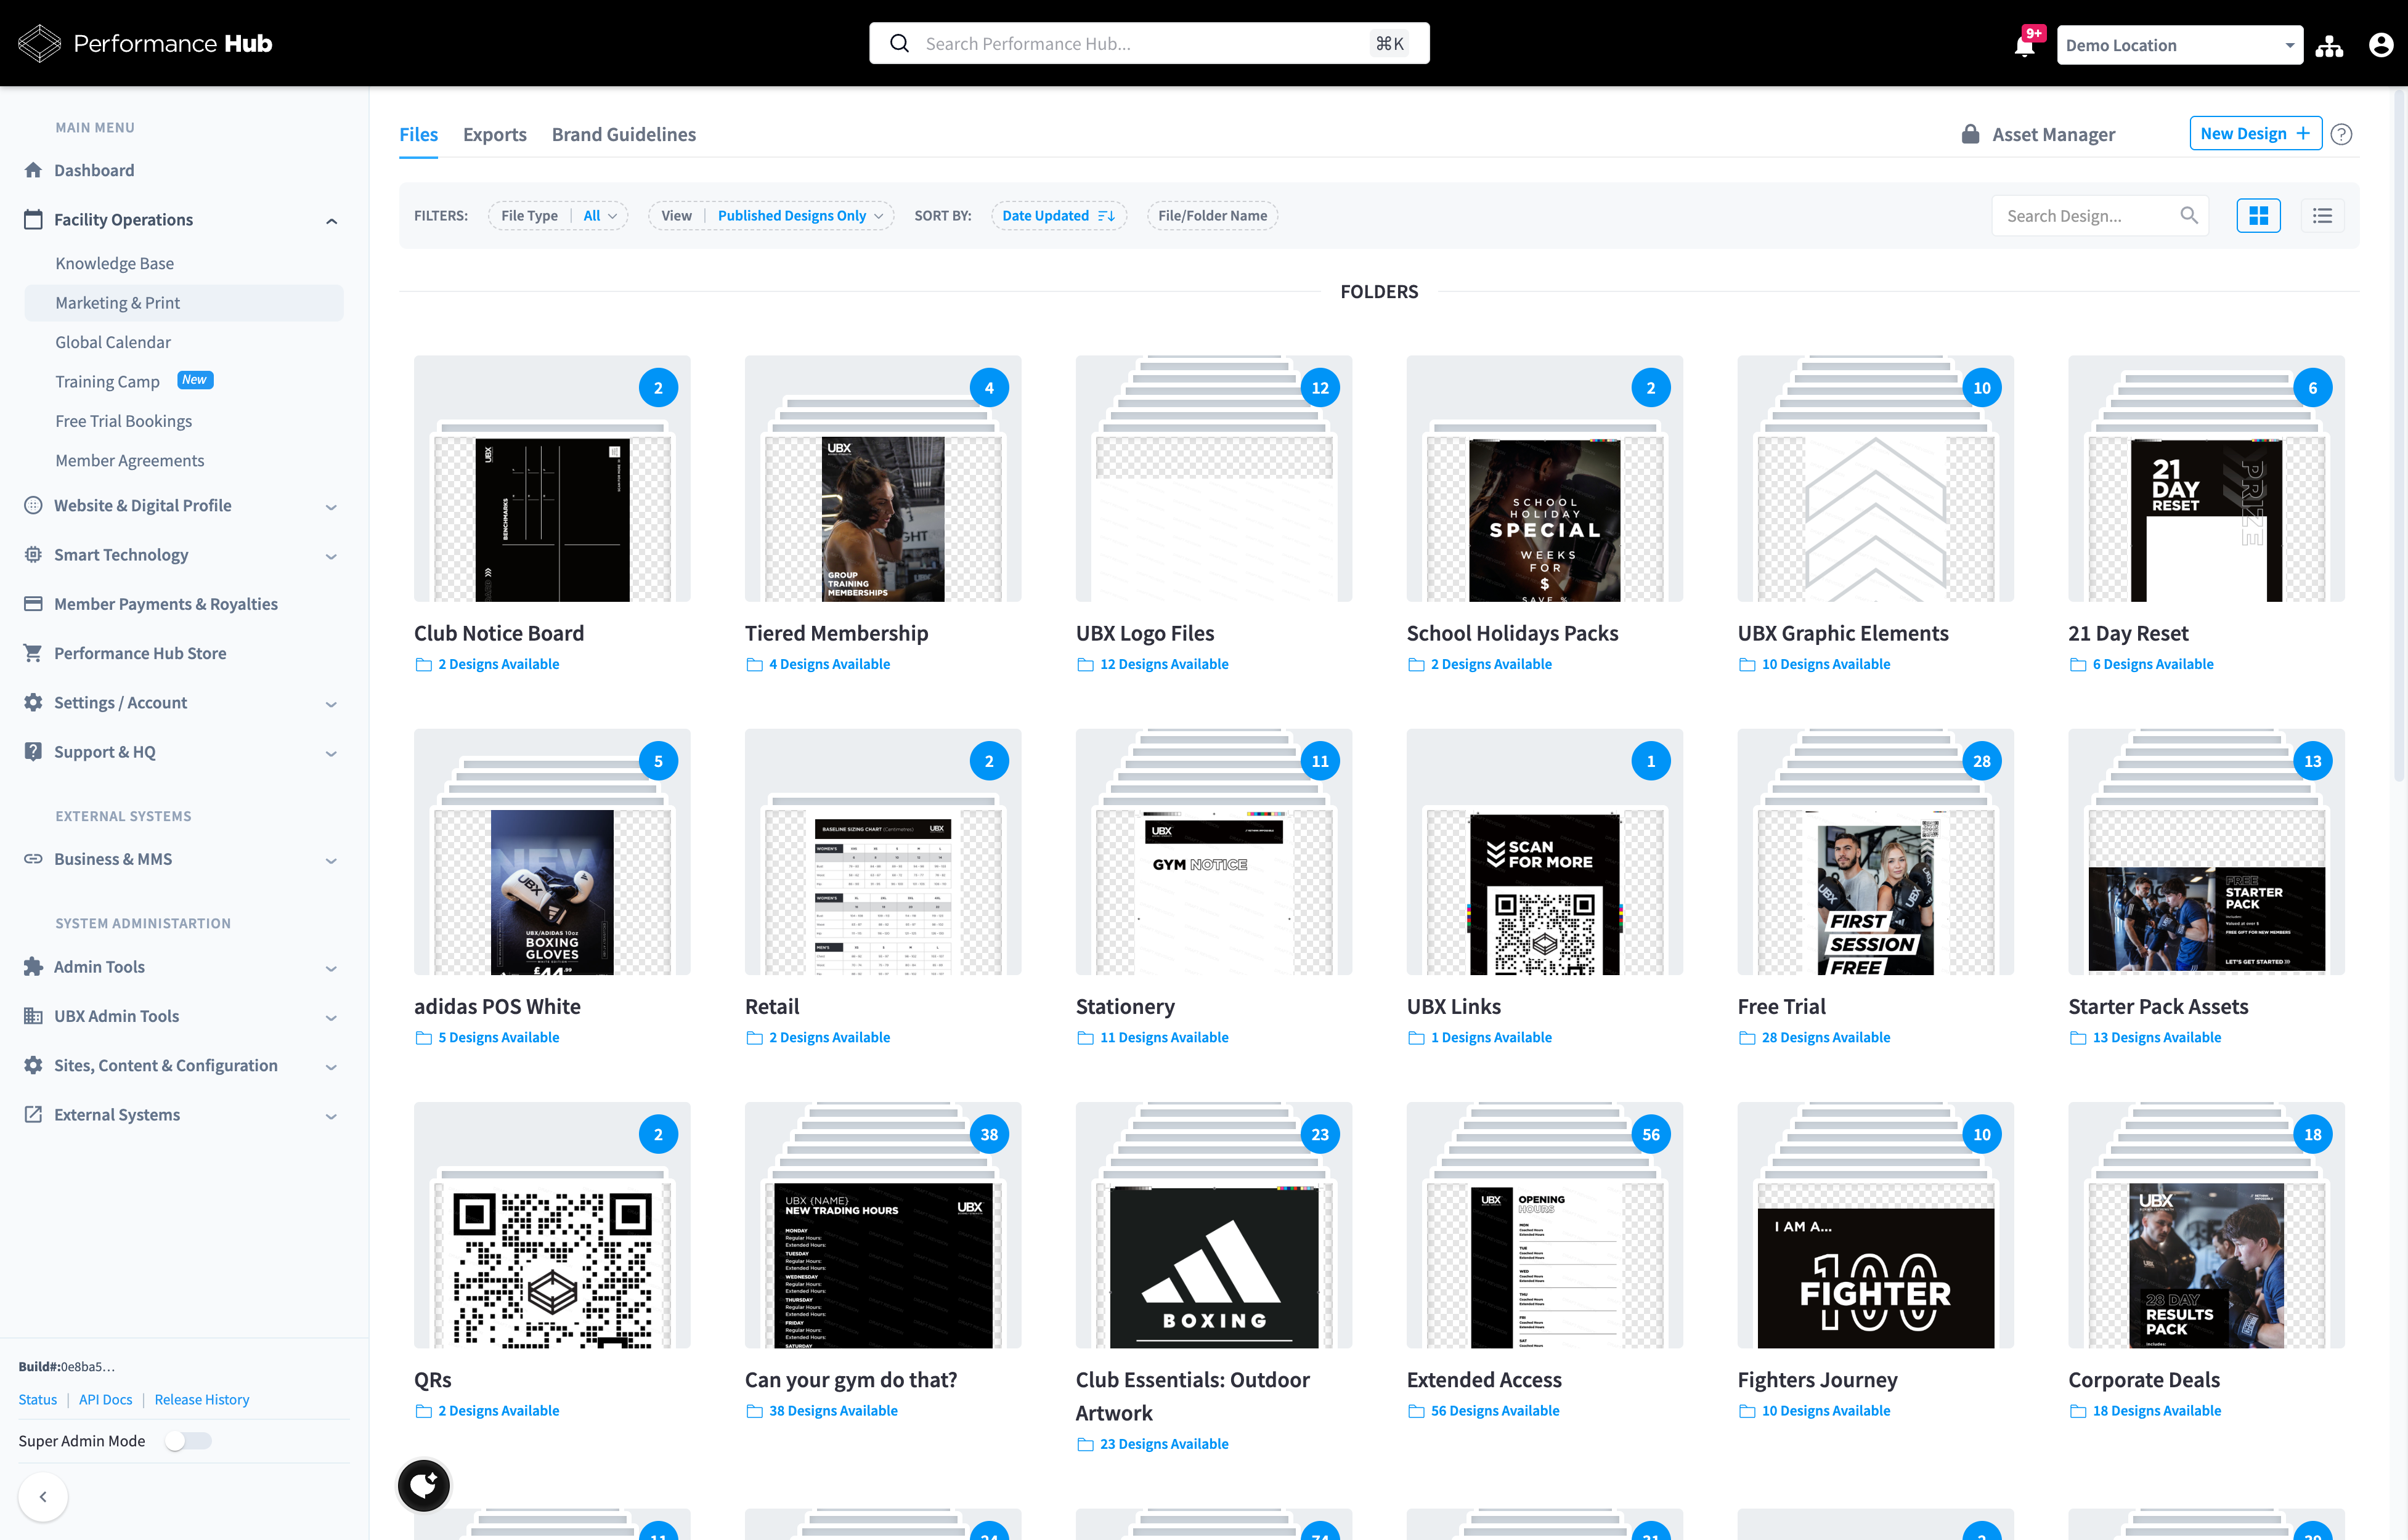
Figure 1: Marketing & Print interface showing design folders and filtering options
Interface Tabs
Your Marketing & Print interface may include the following tabs, depending on what your organizational administrator has configured:
Files Tab - The main tab where you browse and access design templates organized in folders. This is where you'll spend most of your time finding and customizing designs.
Exports Tab - View and download all previously generated exports. This acts as your personal library of customized materials you've created.
Additional Tabs (Organization-Specific) - Depending on your organization's configuration, you may see additional tabs such as:
- Brand Guidelines - Access your organization's brand standards
- Fitout Assets - Facility design resources and spatial planning materials
- Video Assets - Video templates and media resources
- Asset Manager - Centralized repository for approved marketing assets
Understanding Design Types
Marketing & Print offers two types of designs:
Dynamic Designs - Customizable templates where you can modify text, images, and other elements to personalize the material for your facility. These designs include editable fields (variables) that you can customize while maintaining brand standards.
Static Files - Ready-to-use designs that cannot be modified. These are typically brand assets or materials that must remain consistent across all locations.
How Dynamic Variables Work
Dynamic designs contain variables - placeholders that get automatically filled with information specific to your facility. These variables can come from several sources:
Facility Details - Many variables are automatically populated from your Facility Details page, such as:
- Facility name and address
- Phone number and email
- Operating hours
- Social media handles
- Brand information
Facility Variables - Additional custom variables that you can configure specifically for use in Marketing & Print designs. These are managed in the Settings / Account → Facility Variables section. See our Facility Variables page for detailed information.
API-Fetched Data - Some variables are dynamically fetched via API when you open a design, ensuring the most current information is always used.
Variable Format - In design templates, variables appear in the format {{VariableName}}. For example:
{{ClubName}}- Your facility name{{ClubAddress}}- Your facility address{{ClubPhone}}- Your facility phone number{{ClubEmail}}- Your facility email address
When you open a dynamic design, these variables are automatically filled with your facility's information. You can then customize any additional text fields the design provides.
Browsing and Finding Designs
Design Organization - Designs are organized into folders by category or purpose. Each folder displays the folder name, design count, and thumbnail previews.
Filtering Options:
- File Type: All, Dynamic Design, or Static File
- View: Published Designs Only (default) or All Designs (Admin)
Sorting Options:
- Date Updated - Most recently modified designs first (default)
- File/Folder Name - Alphabetical organization
Search Feature - The search bar searches across all designs and folders in your Marketing & Print library. This is the fastest way to find a specific design when you know its name or topic. Simply type your search term and results appear automatically showing matching folders and individual designs.
Exporting Designs
Once you've selected and configured a design, you're ready to export it for use.

Export Process
- Select a design - Click on the design thumbnail to open it
- Review auto-filled variables - Check that facility information populated correctly
- Configure custom fields - Fill in any additional editable fields (dates, messages, specific text)
- Preview the design - Verify all information is correct and fits properly
- Click the Export button - Usually labeled "Export," "Download," or "Generate"
- Choose export format - Select from available formats (typically PDF, PNG, JPG)
- Wait for processing - The system generates your customized file
- Download the file - Save to your computer or device
Understanding Export Formats
The available export formats depend on the design type and intended use:
PDF (Most Common)
- Print-ready quality with exact dimensions
- Professional printing compatible
- Best for: Posters, notices, handouts, official documents
PNG
- High-quality images with transparency support
- Digital display optimized
- Best for: Digital signage, website graphics, social media
JPG
- Compressed images for smaller file sizes
- Universal compatibility
- Best for: Email attachments, quick sharing, web use
Export Quality and Specifications
Print Designs:
- Typically exported at 300 DPI (dots per inch) for professional print quality
- Maintain exact dimensions specified in design details
- Use PDF format to preserve vector quality
Digital Designs:
- Optimized for screen display
- Resolution matches common display sizes
- Use PNG for highest quality, JPG for smaller file sizes
Understanding Color Profiles
Dynamic designs in Marketing & Print support different color profiles depending on the intended use. Understanding these profiles ensures your materials look their best whether printed or displayed digitally.
RGB
- What it is: Color model used by digital screens (computers, phones, tablets, digital signage)
- How it works: Creates colors by combining red, green, and blue light
- Color range: Wider range of bright, vibrant colors
- When to use: Digital displays, websites, email graphics, social media, digital signage
- In Marketing & Print: Used when exporting for digital use (PNG, JPG for screen display)
CMYK
- What it is: Color model used by professional printing presses
- How it works: Creates colors by combining cyan, magenta, yellow, and black ink
- Color range: More limited than RGB, resulting in slightly muted colors
- When to use: Professional printing, offset printing, commercial print shops
- In Marketing & Print: Used when exporting PDF for printing
Selecting Color Modes and Profiles
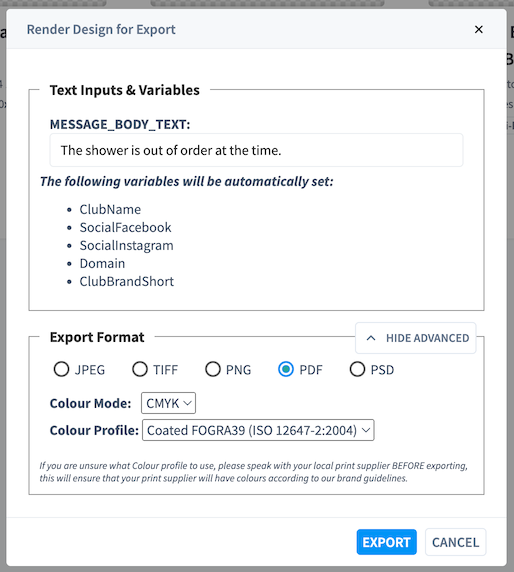
When you export a design, you'll see an export dialog with color options:
Color Mode Selection
- Choose between RGB (digital) or CMYK (print) color modes
- For most printing: Select CMYK
- For digital display: Select RGB
- The appropriate mode is typically pre-selected based on export format
CMYK Color Profiles (Advanced)
If you're exporting for printing, you'll see multiple CMYK profile options. These are different printing standards optimized for specific regions and printing methods:
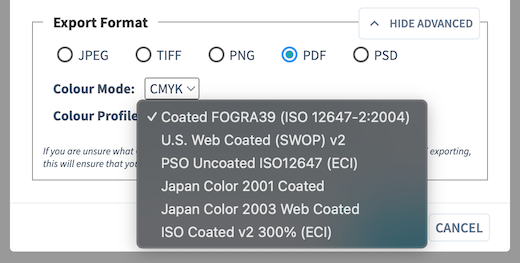
Common CMYK Profiles:
- Coated FOGRA39 (ISO 12647-2:2004) - European standard for coated paper printing
- U.S. Web Coated (SWOP) v2 - United States standard for coated paper web printing
- PSO Uncoated ISO12647 (ECI) - European standard for uncoated paper
- Japan Color 2001 Coated - Japanese standard for coated paper
- Japan Color 2003 Web Coated - Japanese standard for web printing
- ISO Coated v2 300% (ECI) - International standard with high ink coverage
Which Profile Should You Use?
For most users:
- Use the default profile selected by the system
- This works for standard commercial printing in most regions
If your printer requests a specific profile:
- Ask your print vendor which profile they prefer
- Different regions and printers have preferences:
- Europe - Often use FOGRA39 or ISO Coated profiles
- United States - Often use SWOP profiles
- Japan - Use Japan Color profiles
- Uncoated paper - Use PSO Uncoated profiles
Coated vs. Uncoated Paper:
- Coated profiles - For glossy or coated paper stocks
- Uncoated profiles - For standard office paper or uncoated stocks
- Ask your printer what paper type they're using
How Color Profiles Work in Dynamic Designs
Smart Defaults
Marketing & Print designs are built to handle color profiles intelligently:
- Design Creation - Designs are created with colors optimized for both print and digital use
- Export Dialog - When you export, you'll see color mode and profile options
- Appropriate Defaults - The system pre-selects appropriate settings:
- PDF exports → CMYK color mode with recommended profile
- PNG/JPG exports → RGB color mode for digital display
- Brand Colors Protected - Your organization's brand colors are configured to work correctly across all profiles
What This Means for You
For most exports, you can use the default settings without changing anything. The system selects appropriate color modes and profiles based on best practices.
When to customize:
- Your print vendor requests a specific CMYK profile
- You're printing in a specific region with regional standards
- You're using uncoated paper instead of coated paper
- You need RGB instead of CMYK for digital printing methods
Why Colors May Look Different
You might notice colors appear slightly different between your screen preview and printed output:
Screen Preview (RGB)
- Displays in RGB since you're viewing on a screen
- May appear brighter and more vibrant
- Shows how digital versions will look
Printed Output (CMYK)
- Converts to CMYK when printed
- May appear slightly less vibrant
- Some bright screen colors cannot be perfectly reproduced with ink
This is normal and expected. Professional designs account for these differences, and your brand colors are configured to look appropriate in both formats.
Working with Print Vendors
When sending designs to professional printers, they may ask about color profiles:
Questions Your Printer Might Ask:
-
"What color mode is the file?"
- Answer: "CMYK" (for print files)
-
"Which CMYK profile did you use?"
- Answer: Tell them the specific profile you selected (e.g., "Coated FOGRA39" or "U.S. Web Coated SWOP v2")
- If unsure: "I used the default profile - which profile do you recommend?"
-
"What resolution is the file?"
- Answer: "300 DPI, print-ready" (Unless your organization admin has uploaded and configured designs in another resolution)
-
"Is the file print-ready?"
- Answer: "Yes, colors are already converted to CMYK"
Asking Your Printer:
Before exporting, you can ask your printer:
- "Which CMYK profile do you prefer?" (they may specify FOGRA39, SWOP, ISO Coated, etc.)
- "Are you using coated or uncoated paper?" (helps you choose the right profile)
- "Do you have a preferred color profile for your press?"
- "Do you need any specific color profile for your region?"
Regional Standards:
- Europe - Often prefer FOGRA39 or ISO Coated profiles
- United States - Often prefer SWOP profiles
- Japan - Use Japan Color profiles
- International printing - ISO Coated profiles often work well
If they need RGB instead (rare):
- Some digital printing methods use RGB
- Export as PNG at high quality
- Select RGB color mode in the export dialog
Color matching:
- If exact color matching is critical, request a printed proof before the full run
- Discuss Pantone color matching if your brand requires it
- Remember that every printer and paper type produces slightly different results
- Test prints help ensure the CMYK profile matches your printer's output
Working with Dynamic Designs
Configuring Variables
When you open a dynamic design, you'll see:
Auto-Populated Variables - Information automatically filled from your Facility Details and Facility Variables configuration. These appear as completed fields in the design.
Editable Custom Fields - Additional fields you can customize for the specific design (this is configured per design):
- Regular text inputs (dates, times, locations)
- Custom messages and announcements
- Custom images (if the design supports them)
Example: Creating a Facility Notice
When creating a notice about a facility issue:
- Open the design - Select "Gym Notice" or similar template
- Review auto-filled info - Facility name, address, contact details appear automatically
- Add your message - Fill in the custom text field with your specific announcement
- Set dates - Add effective date or timeframe for the notice
- Preview - Check that all information displays correctly
- Export - Generate your customized notice as PDF for printing
The design maintains professional formatting automatically while you focus on the message content.
Variable Tips
Keep text concise - Ensure custom text fits within the design layout
Verify dates - Double-check event dates and timeframes are correct
Review contact info - Confirm auto-populated facility details are current
Check the preview - Always review the full preview before exporting
Viewing Design/Export History
Accessing Your Exports

All your generated exports are saved and accessible in the Exports tab:
- Click the "Exports" tab at the top of the Marketing & Print interface
- Browse your previously generated materials
- Click on any export to download it again
- No need to recreate - simply re-download when needed
Why This Matters
The Exports tab serves as your personal library of marketing materials:
Re-download anytime - Need to reprint a previously created design? Simply download it again from your export history.
Share with team members - Multiple people at your facility can access the same file without recreating it.
Review past materials - See what marketing materials you've created and when.
Quick reordering - When you need to reorder printed materials, the file is ready to send to your printer.
Export Storage
Exports are typically stored indefinitely in the Exports tab. However, storage policies may vary by organization. Check with your organizational administrator about your organization's specific retention policy.
Best Practice: Save important exports to your computer or network drive as backup for quick access even without logging into Performance Hub.
Common Scenarios
I Need to Update Facility Information in Designs
If your facility information (address, phone, hours) needs updating:
- Update your Facility Details page first
- Changes automatically flow to new designs using those variables
- Previously exported designs won't update - create new exports as needed
For custom variables you've created, update them in Settings / Account → Facility Variables. See our Facility Variables guide for details.
The Design Doesn't Have a Field I Need
If a design template is missing a variable or field you need:
- Check if you can create a User Variable in Facility Variables for facility-specific content
- Contact your organizational administrator to request:
- Additional fields be added to the design
- A new design template that includes your required fields
- Guidance on alternative designs that might work
Text Doesn't Fit in the Design
If your custom text is too long for a field:
Options:
- Shorten your message while keeping key information
- Use abbreviations where appropriate and clear
- Request a different design with more space
- Split into multiple materials if you have extensive information
Do not: Try to make text smaller or force more text than the field allows - this compromises readability.
Getting Help
For Variable and Design Issues
Facility information incorrect - Update your Facility Details page
Custom variables - See Facility Variables
Design-related questions - Contact your organizational administrator
Technical problems - Contact Performance Hub support through Main Menu → Support & HQ
Requesting New Designs
To request new design templates:
- Contact your organizational administrator
- Describe what you need (purpose, size, required fields)
- Provide examples if helpful
- Allow time for design and approval processes
Additional Resources
Facility Variables - Complete guide to understanding, viewing, and customizing facility variables used in dynamic designs.
Tips and Best Practices - Daily usage tips, creating effective materials, print production best practices, and seasonal planning guidance.
Common Questions - Frequently asked questions about accessing designs, customizing templates, exporting files, and troubleshooting common issues.
Marketing & Print streamlines the creation of professional, on-brand materials for your facility. By combining pre-approved templates with automatic facility information and guided customization, it ensures consistency while allowing you the flexibility to communicate effectively with your members.