
The Hardware
Your AI Agent runs on a dedicated appliance called the AI Agent Processor — a compact, business-grade mini PC that lives at your facility. It arrives pre-imaged and pre-configured: there is nothing to install on it and no software to license. You connect power and network, and pair it with your facility from the AI Agent module.
This page covers the physical device: what it is, where to put it, how to connect it, and where its regulatory information lives.
The current appliance
The appliance is built on the ASUS NUC Rugged line — fanless, industrial-grade mini PCs designed for 24/7 operation. Performance Hub has been running the NUC product line for several years and manages many thousands of these units in the field: it is a tried and time-tested hardware solution.
Note: Hardware revisions improve over time, so a newer unit may differ in model or appearance. The software experience — the applet, the agent, backups, and updates — is identical across revisions. Your device's exact model and serial number are always shown in the device drawer under Overview → Identity.
Key characteristics of the current revision:
- Fanless, solid-state design — no moving parts, silent operation, suitable for front-of-house placement.
- Compact footprint — small enough for a comms cabinet, under a desk, or on a shelf.
- Wired Gigabit Ethernet plus dual-band Wi‑Fi.
- HDMI output — used for the built-in status screen (see below).
- Solid-state on-device storage for your agent's data. Current usage is shown live in the device drawer under Overview → Storage.
For detailed specifications, manuals, and support resources for the underlying hardware platform, see ASUS NUC support.
Placement and installation
Follow the same practices as any always-on appliance at your facility:
- Hard-wire it if at all possible. Connect the device to your network with an Ethernet cable rather than Wi‑Fi. A wired connection is faster, more reliable, and immune to Wi‑Fi congestion — and because the agent works for you around the clock (backups, automations, notifications), a dependable connection matters more than it would for a laptop. Wi‑Fi is fully supported as a fallback (see Connecting to your network).
- Give it constant power. Plug it into a socket that is not on a switched circuit or timer. If you have a UPS protecting your network gear, put the device on it too.
- Keep it ventilated. The unit is fanless and cools passively — leave a few centimetres of clearance and avoid enclosing it in a sealed cabinet with other heat-producing equipment. You can check the running temperature at any time under Overview → Live metrics → CPU temperature.
- Place it securely. The device holds your business data, so treat it like a server: staff-only areas, comms cabinets, or locked offices are ideal. (All data on the device is also backed up to the cloud — see Backups.)
- Antenna separation. The device should be installed with a minimum separation of 20 cm from the antenna to any person, to comply with RF exposure limits (this applies when using Wi‑Fi).
Connecting to your network
Ethernet (recommended). Plug a network cable into the device before powering on. The device acquires an address automatically via DHCP — no configuration needed. The applet shows the active connection type under Overview → Connection → Network (e.g. ethernet).
Wi‑Fi (fallback). If the device has no cable and can't get online, it broadcasts a temporary open setup hotspot named AI-Agent-<serial>. Join it from a phone or laptop and follow the setup page to select your Wi‑Fi network and enter its password. The hotspot disappears as soon as the device is online — and immediately if you plug in an Ethernet cable.
Your network needs to allow ordinary outbound internet access (HTTPS). The device makes only outbound connections — you do not need to open ports or configure port-forwarding.
The pairing QR sticker
Every device ships with a durable silver QR sticker attached to it — the same style of non-fading label as a warranty or serial sticker on the back of a computer. The QR code contains the device's unique serial number: scan it with your phone and it takes you straight to the device pairing screen in Performance Hub.

Figure 1: The pairing QR sticker attached to each device — scan it to pair the device in Performance Hub
If the sticker is ever damaged or lost, you're not stuck: the pairing code is simply the device's serial number, which is also printed on the bottom/back of the device and can be entered manually in Performance Hub.
The HDMI status screen
If you connect the device to a monitor or TV over HDMI, it displays a status screen that is especially handy during setup:
- The device's current network status (connected / waiting for network) and addresses.
- Its pairing state — whether it is waiting to be added to a facility, or already paired.
A screen is never required for day-to-day operation; everything is managed from the Performance Hub applet.
Identity, model, and serial number
Each device's identity is shown in the device drawer under Overview → Identity:
- Location — where you said the device is installed.
- Model — the hardware model.
- Serial number — matches the pairing QR sticker and the label on the bottom/back of the unit.
- Facility — the facility the device is paired to.
You need the serial number when pairing the device, when replacing hardware, and when talking to support.
Compliance and regulatory information
Click Compliance details at the bottom of the Overview tab to open the Compliance dialog for your device.
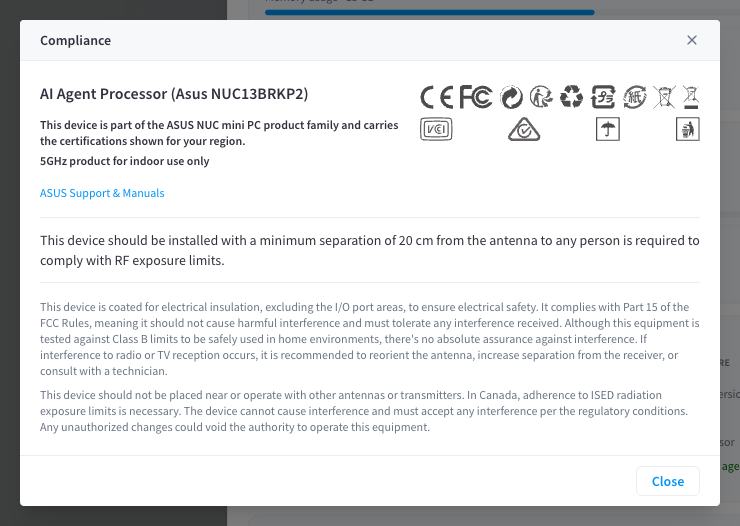
Figure 2: The Compliance dialog — certifications and regulatory guidance for the current hardware revision
The dialog shows:
- The device family and model, and the certification markings that apply in your region (CE, FCC, and others).
- Usage constraints — e.g. "5GHz product for indoor use only" and the 20 cm RF-exposure separation guidance.
- Interference guidance: the device complies with Part 15 of the FCC Rules (tested against Class B limits) and, in Canada, with ISED radiation-exposure limits. If interference to radio or TV reception occurs, reorient the antenna, increase separation from the receiver, or consult a technician. Unauthorized modifications could void the authority to operate the equipment.
- A link to ASUS Support & Manuals for the underlying hardware platform.
Related pages
- Getting started — unboxing to first chat
- Device management — metrics, storage, updates, and remote actions
- Backups — how the device's data is protected in the cloud