Adding a Door or Gate
This guide covers pairing a new door/gate controller with your facility so it appears in the Doors tab and can be unlocked from the mobile app. Pairing takes a couple of minutes once the controller is powered and on your network.
Before you start
- The door controller must be physically installed, powered on, and connected to your network (Ethernet or Wi-Fi). The pairing dialog checks that the device is online and will not let you add an offline controller.
- The relay should be wired to your locking hardware (strike, maglock, or gate) — see the Relay Wiring Guide.
- You need the controller's pairing QR sticker (attached to the unit) or its serial number — printed on the sticker and on the device label.
- Make sure the correct facility is selected in the Performance Hub toolbar; the door is registered to whichever facility is active.
Pair the controller
The fastest way to pair: scan the QR sticker attached to the controller with your phone. The sticker encodes the device's unique serial number, and scanning it takes you straight to the device pairing screen in Performance Hub.

Figure 1: The pairing QR sticker attached to every controller — scan it to jump straight to pairing
You can also pair manually:
- Open Door/Gate Access → Doors.
- Click Add Device (top right of the door list).
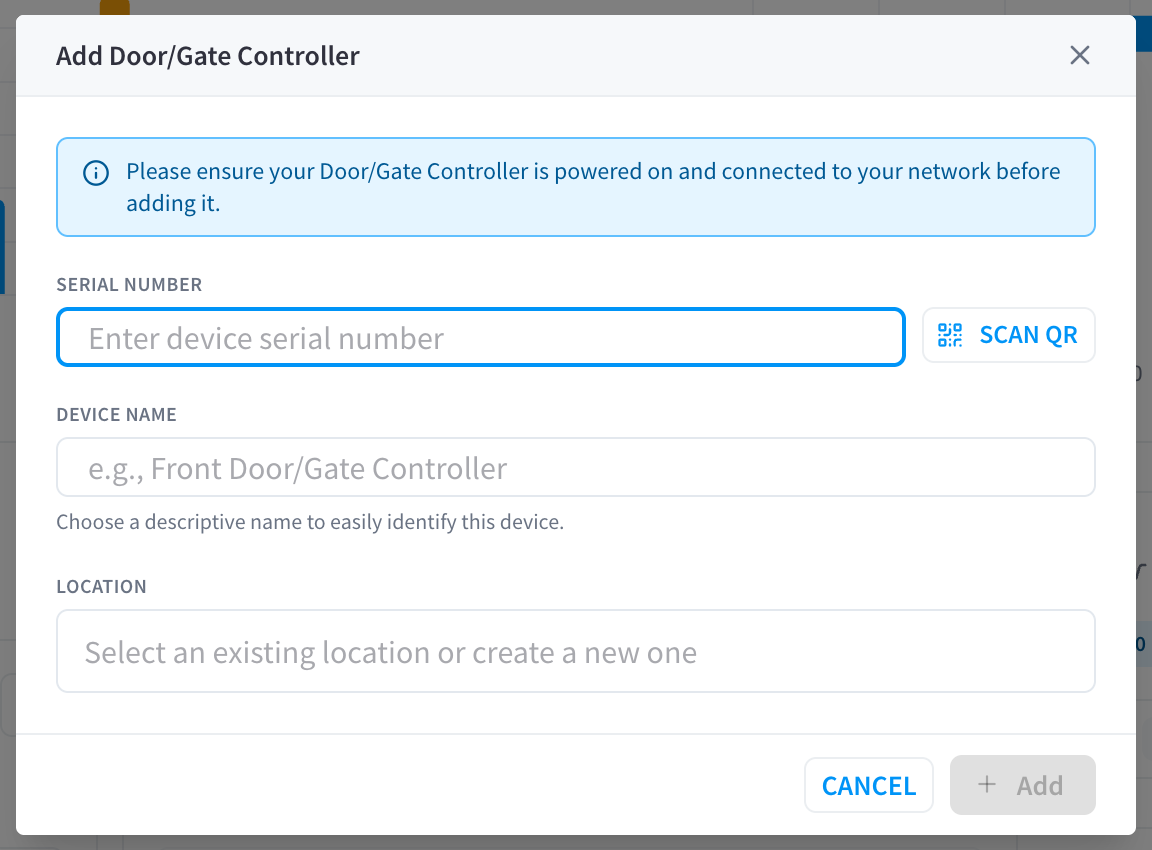
Figure 2: The Add Door/Gate Controller dialog
- Enter the Serial Number (pre-filled if you scanned the sticker), or click Scan QR to scan the sticker with your computer's camera (click Stop to end scanning).
- Wait for the online check. You'll see Checking device status… followed by:
- Device is online — you can continue.
- "The device you are trying to add is not currently online. Please connect the device to your network, then retry." — fix the device's power/network and try again. A device counts as online when it has reported in within the last 5 minutes.
- Enter a Device Name — e.g. Front Door/Gate Controller. Choose a descriptive name; this is the name members see in the mobile app.
- Choose a Location — select an existing location label or type a new one (up to 64 characters). The location is only used to group doors in the Doors list; it doesn't affect access policy.
- Click Add.
The new door appears in the Doors list under its location group. All four fields (online status, serial, name, location) are required before Add is enabled.
After pairing
A freshly added door uses sensible defaults — review them in the door's settings panel (gear icon on the door card):
| Setting | Default |
|---|---|
| Icon | Door (standard single door) |
| Hold time | 10 seconds |
| Maintenance mode | Normal |
| Auto-unlock schedule | Off |
| Access rules | Inherits facility rules |
| Geofence | Inherits facility geofence |
Recommended next steps:
- Pick an icon that matches the entry type (boom gate, garage, pedestrian gate, etc.) — see Doors → Configuration tab.
- Test it — click Open on the door card to send an admin unlock and confirm the relay fires.
- Check who can access it — by default the door follows the facility's Access Rules. Add it to an Access Scope if it should follow a different policy or be grantable as a bundle.
Advanced device management
The controller also appears in the Device Management module, which handles firmware/software updates, network diagnostics, and low-level device configuration. From the door's Overview tab, follow Open in Device Management for advanced configuration.
Related pages
- Door & Gate Controller — the hardware itself: models, panel layout, indicator lights
- Relay Wiring Guide — wiring the relay to your lock
- Doors — full reference for door settings
- Troubleshooting — controller offline or not unlocking