
Reports
The Reports tab (the default view when you open AI Insights & People) turns detection data into facility-level analytics: how busy you are, when, where, who your visitors are, and how they seem to feel about it.
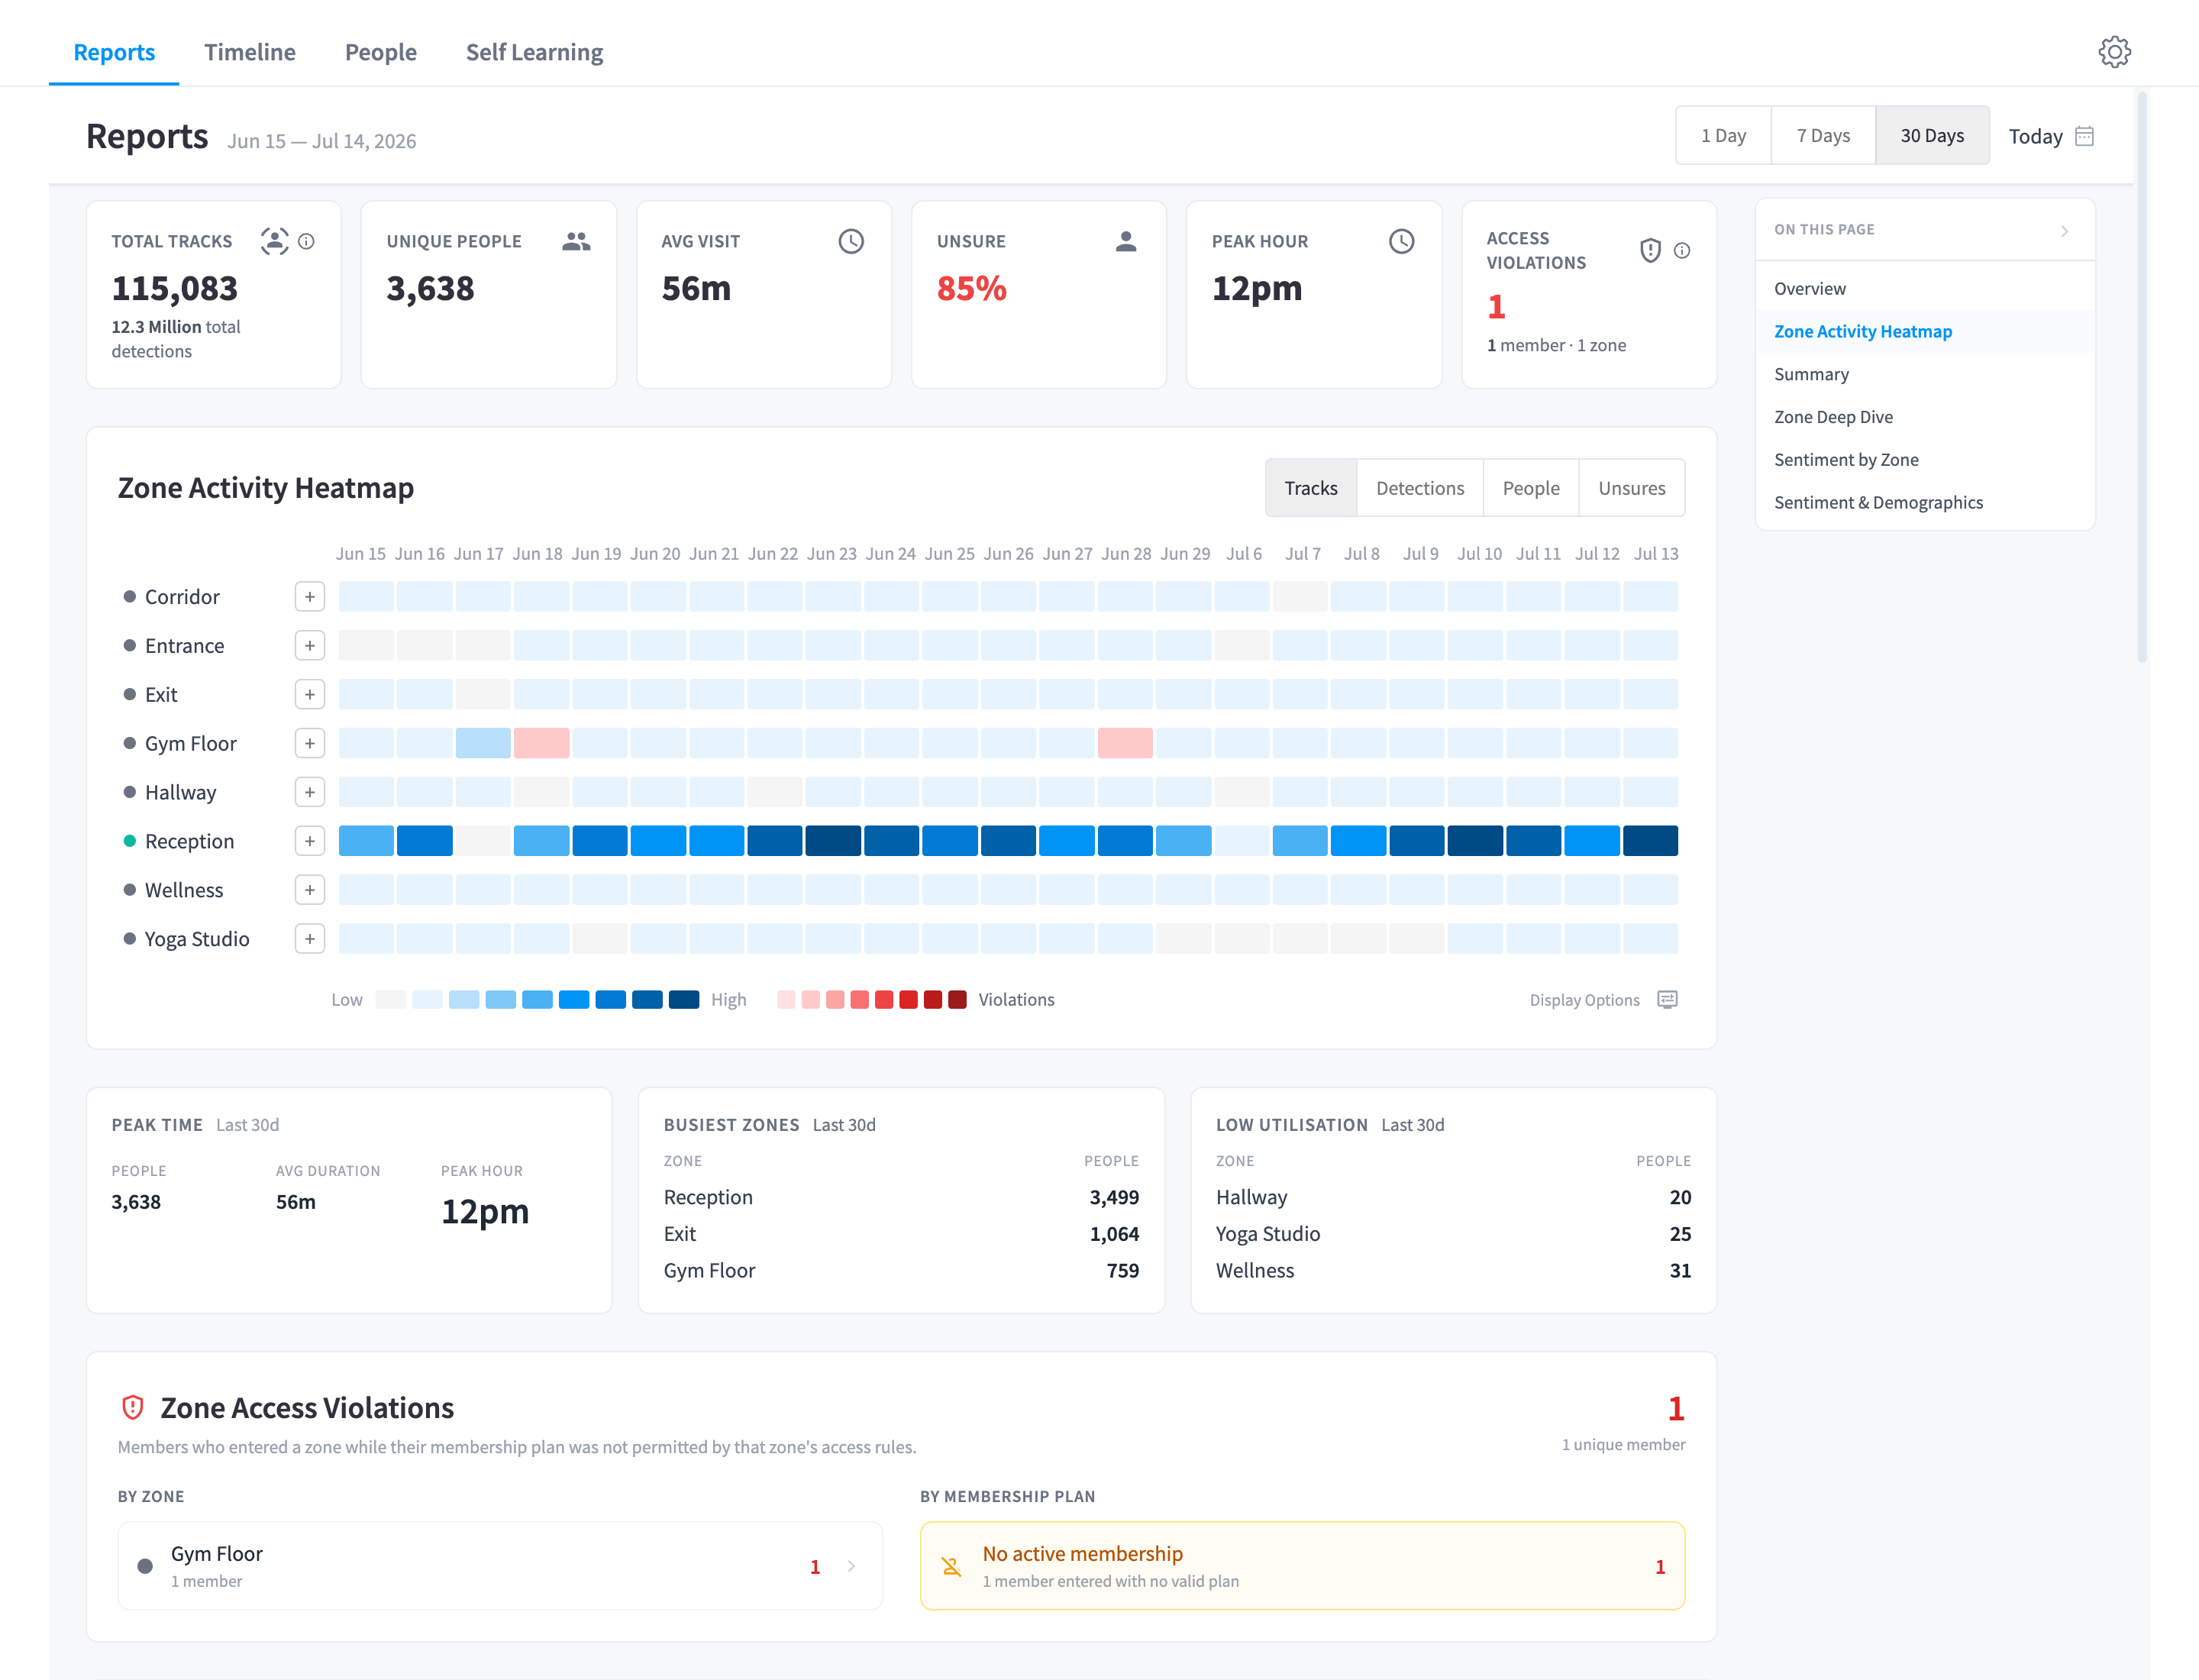
Figure 1: The Reports view for Lower Manhattan — KPIs across the top, the Zone Activity Heatmap, and summary cards
How report data is produced
Reports are built from daily snapshots generated overnight (facility-local time) for the previous day, aggregated from the same detection blocks that power the People timeline. Two consequences:
- Today's data appears tomorrow — Reports is a trends view, not a live view (the zone deep dive's "Live now" indicator is the exception).
- Numbers are AI-derived — they can differ from your member management system's check-in counts, because they include people who never swiped.
Meaningful zone analytics require access zones: the heatmap's empty state says it directly — "No zones configured — assign cameras to access zones in Settings".
KPI tiles

Figure 2: The KPI tiles — Total Tracks, Unique People, Avg Visit, Unsure %, Peak Hour, and Access Violations
| KPI | Meaning |
|---|---|
| Total Tracks | "A track represents one continuous sighting of the same person. Total detections is every face detected across all cameras in the system." The subtitle shows the raw detection count |
| Unique People | Distinct individuals seen in the period |
| Avg Visit | Average visit duration |
| Unsure | The share of people who couldn't be identified — your identification health metric. A rising Unsure % usually means missing/poor member photos or a camera problem |
| Peak Hour | The busiest hour of the period |
| Access Violations | "Entries where a member's active membership plan was not permitted by the zone's access rules (excluded, or not in the allowed plans)." Subtitle: "N members · M zones" — or "No plan violations" |
Zone Activity Heatmap
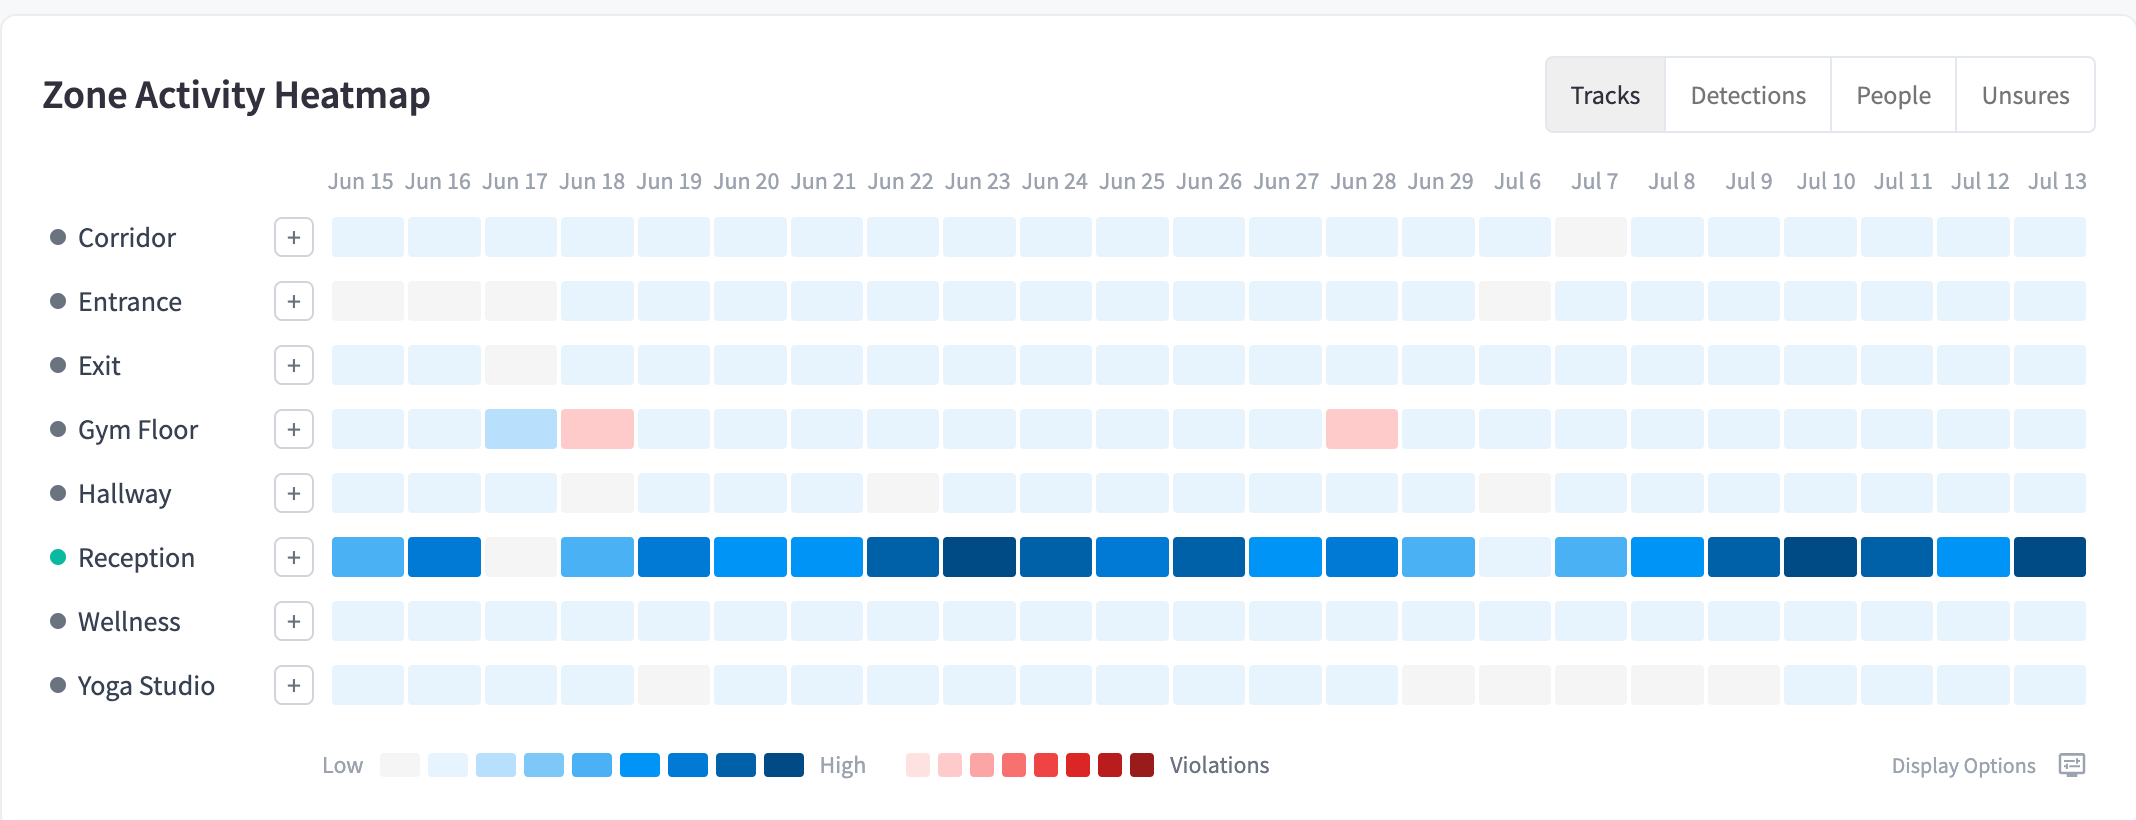
Figure 3: The Zone Activity Heatmap — zones down the side, hours across the top, colour intensity showing activity
Each row is a zone, each column an hour; cell intensity shows activity. Controls:
- Mode selector: count Tracks, Detections, People, or Unsures per cell. The Unsures mode is a great lens for finding where unidentified people concentrate.
- Display Options: toggle Peak Hour Heatmap, Cell Counts (print numbers in cells), and Violations (overlay access-violation markers).
- Click a zone name to open its deep dive; drill-down links jump straight to the filtered timeline: "Go to Timeline", "Go to Timeline (Access Violation)", "Go to Timeline (Expired)".
Beneath the heatmap, three summary cards give the headline story: Peak Time (people, average duration, peak hour), Busiest Zones, and Low Utilisation — the last being the interesting one for floor-planning: space you're paying for that members aren't using.
Zone Access Violations

Figure 4: Zone Access Violations — who was detected in a zone their plan doesn't permit, and where
The "Zone Access Violations" section lists each violation: the member, the zone, and when. A violation is a plan-rule breach — the member's active membership plan was excluded from, or absent from, the zone's allowed plans (configured in Access zones). When there's nothing to report: "No membership-plan access violations in this period."
Each entry links to the person's profile and to the timeline filtered to the violation, so you can see the actual footage before having a conversation with the member.
Zone deep dive
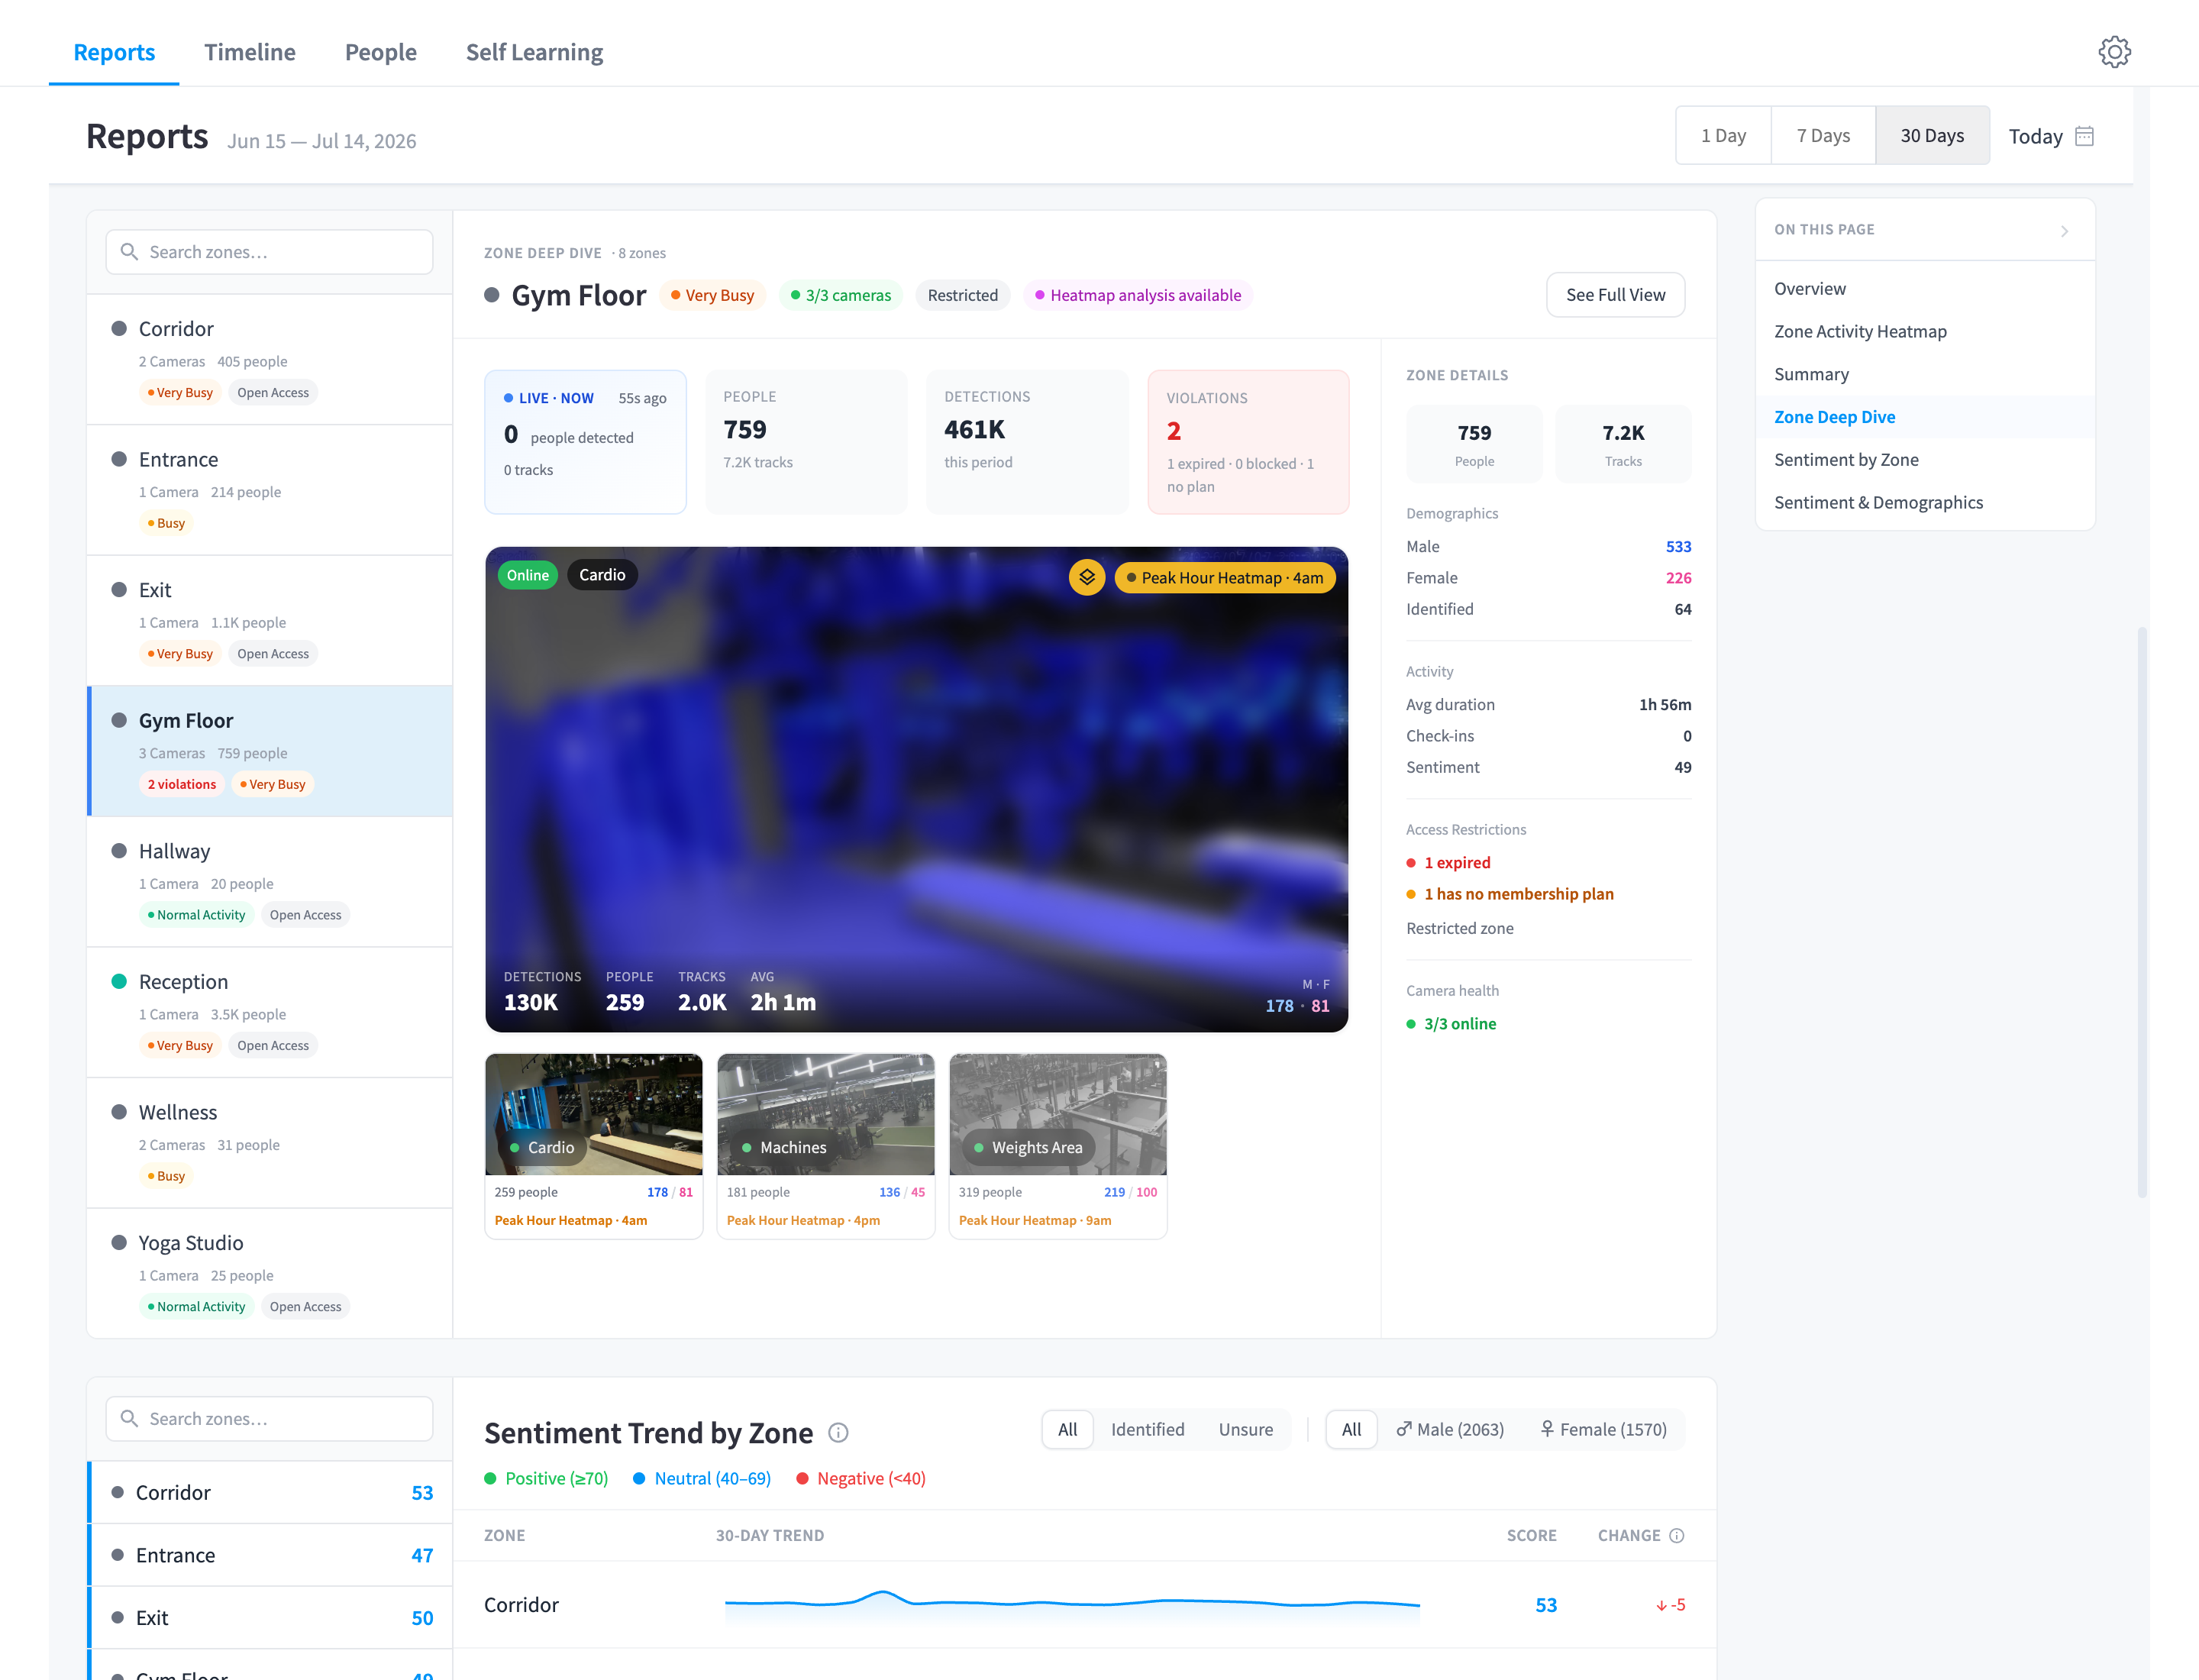
Figure 5: A zone deep dive — per-zone KPIs, hourly heatmap, and identity/gender filters
Clicking a zone opens its dedicated view:
- Zone badges summarise its character: "Very Busy", "Restricted" / "Open Access" ("Anyone can access" vs "Restricted zone").
- Per-zone KPIs: people, tracks, detections, check-ins, and the zone's sentiment score.
- A per-zone "Peak Hour Heatmap", and a "Live now" indicator with the most recent activity.
- Filter chips: All / Identified / Unsure and ♂ Male / ♀ Female with live counts.
- "See Full View" expands the zone to a full-page report.
Sentiment Trend by Zone
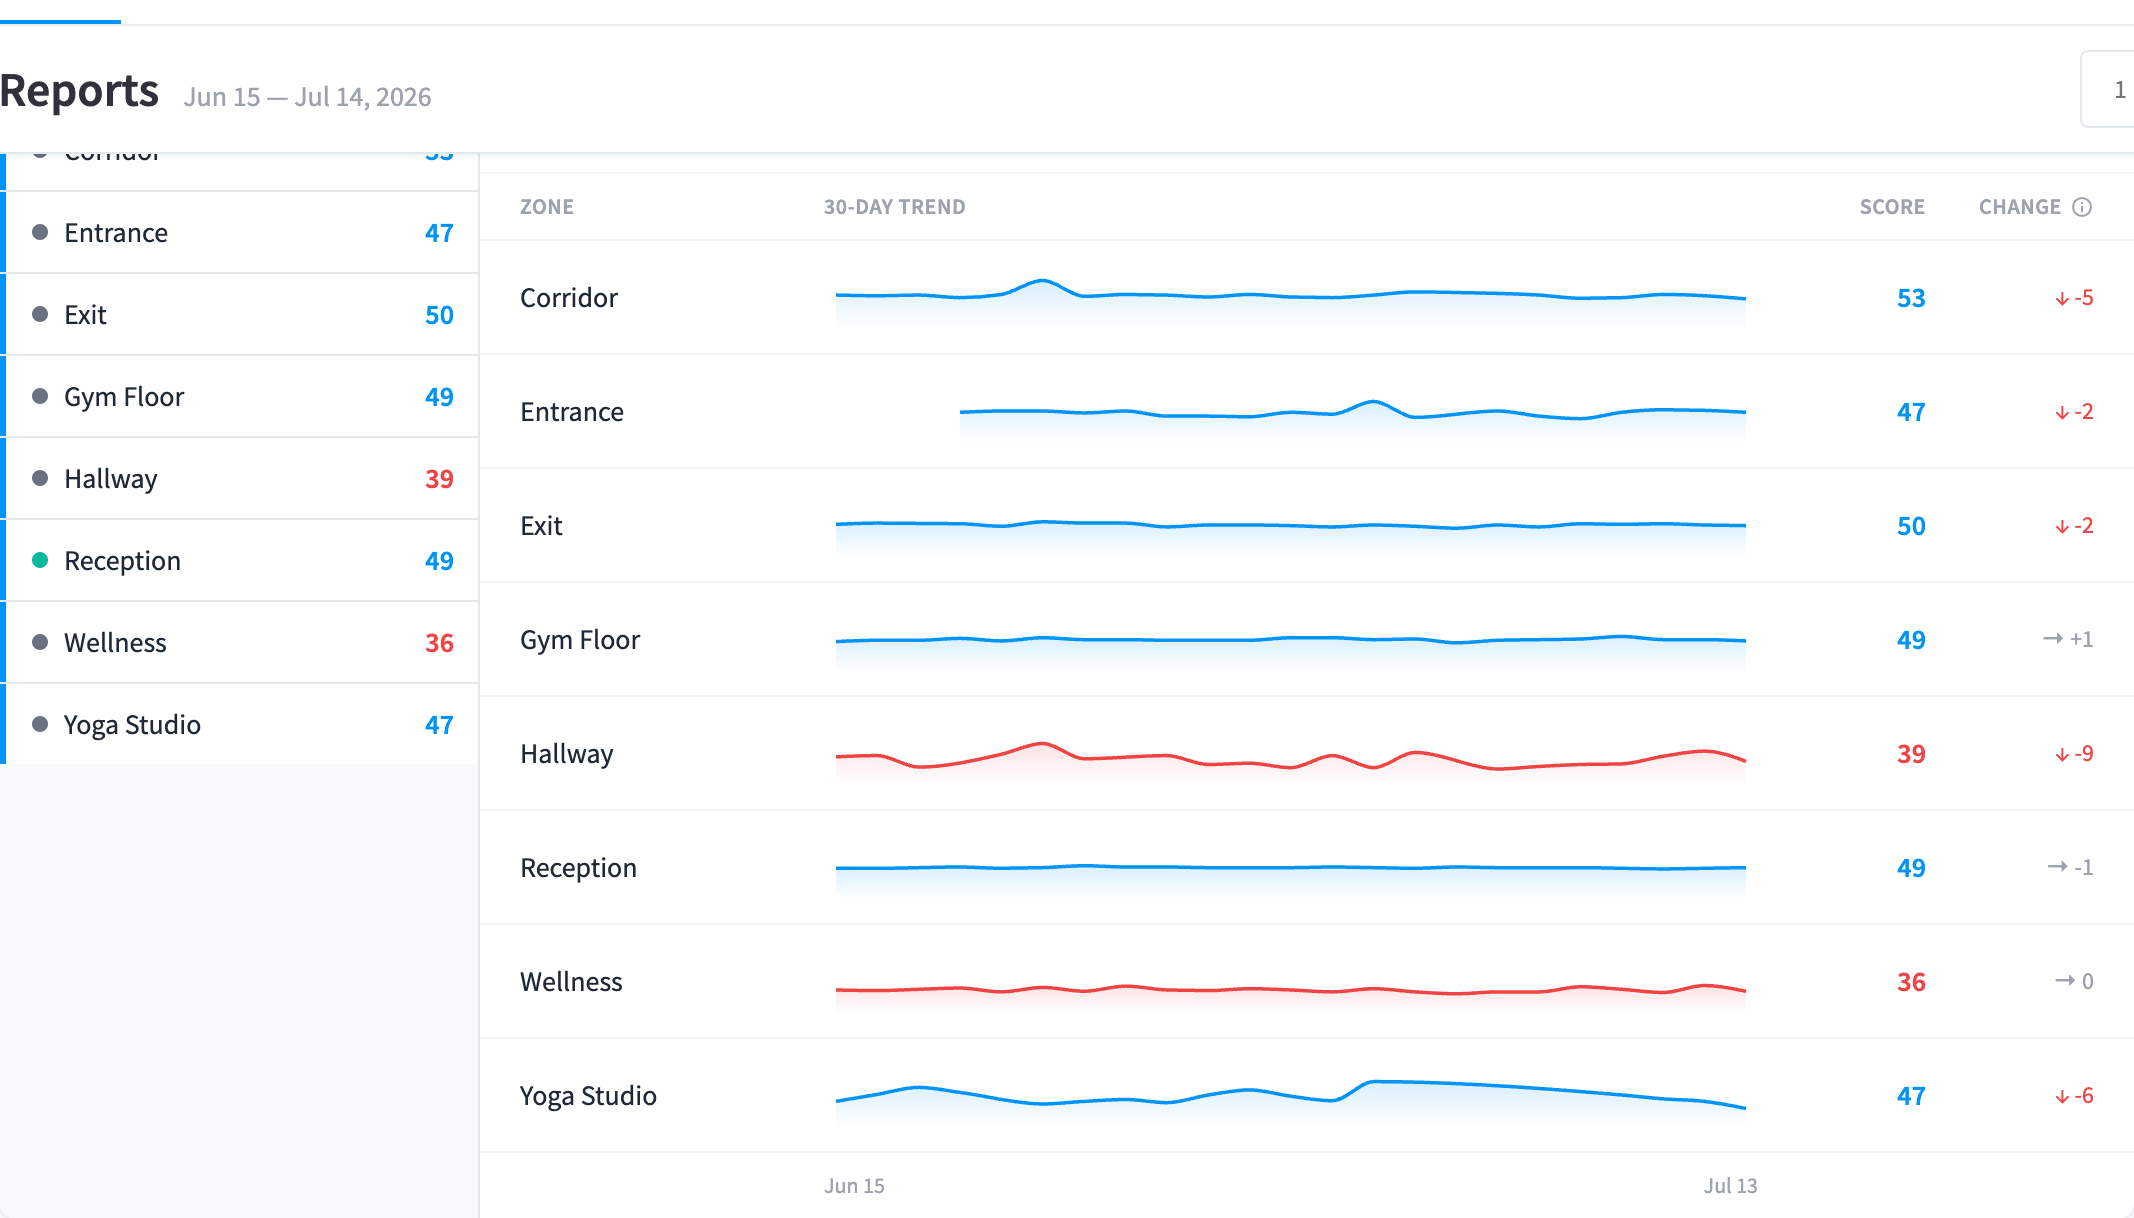
Figure 6: Sentiment Trend by Zone — per-zone sentiment scores and their 24-hour trend
"Sentiment Score reflects the overall emotional tone of people detected in this zone." Scores run 0–100, banded as:
| Band | Score |
|---|---|
| Positive | 70 and above |
| Neutral | 40–69 |
| Negative | below 40 |
The "24h trend" compares "the average sentiment in the most recent third of the period and the earliest third" — a falling zone score is worth a walk-through: overcrowding, broken equipment, and temperature complaints all show up here before they show up in feedback forms.
How raw expressions become a score — including the emotion weightings and the Business Context presets (Default, Gym/Fitness, Custom) — is configurable in Settings → Insights → Sentiment Scoring.
Sentiment & Demographics
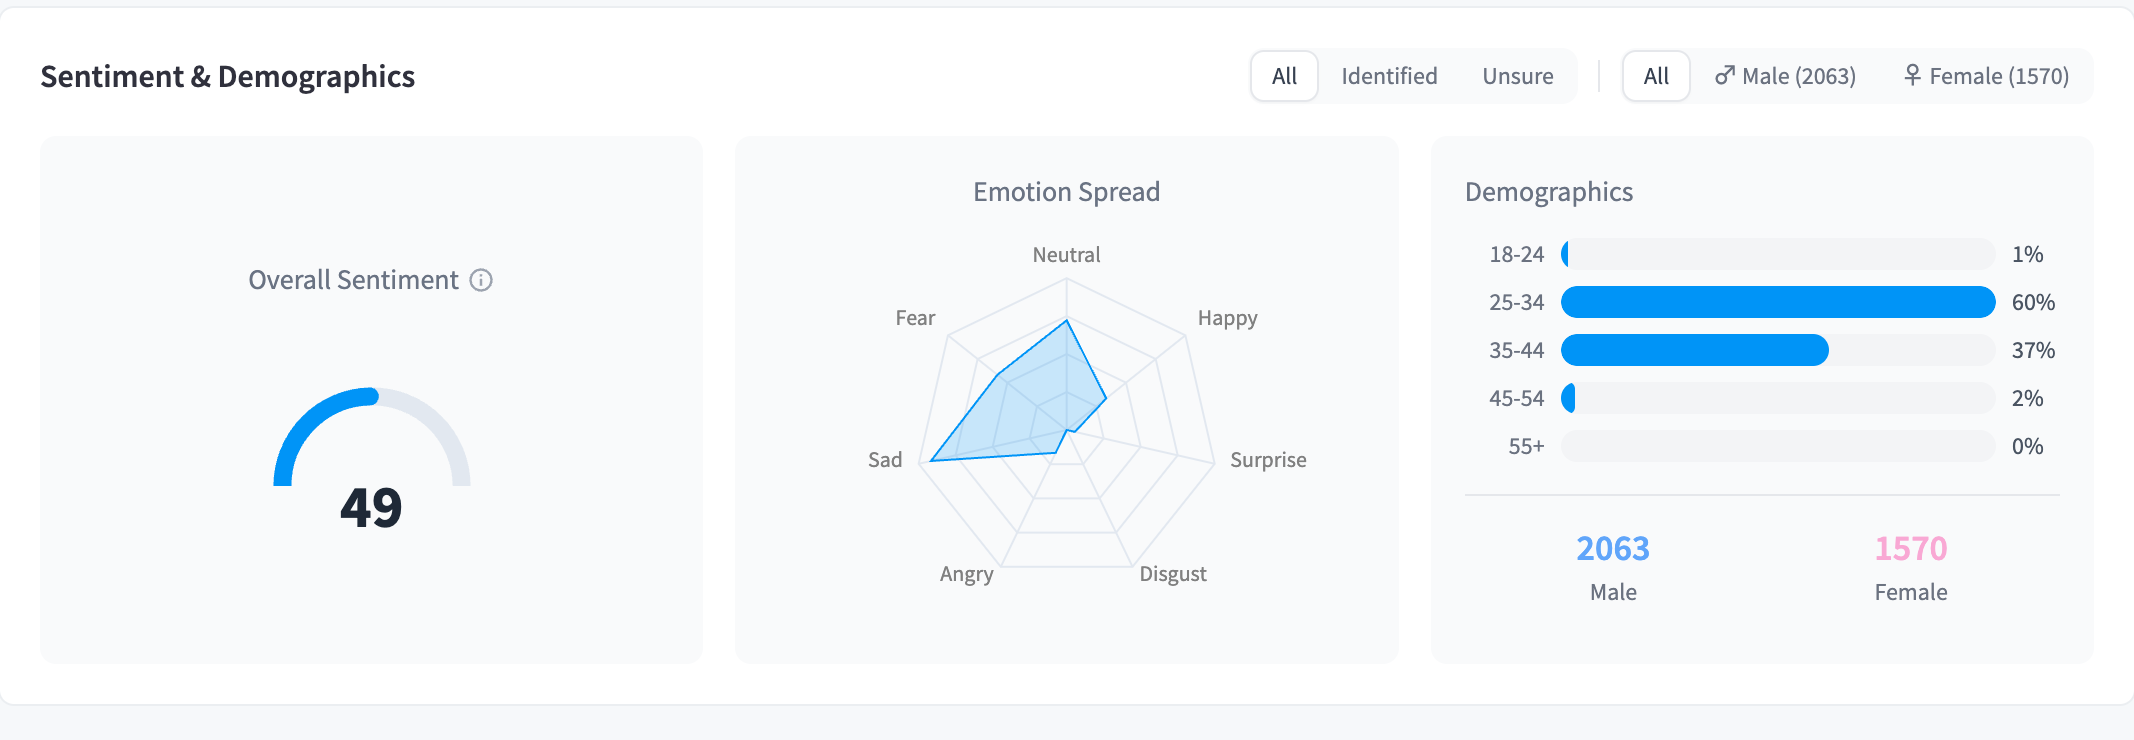
Figure 7: Sentiment & Demographics — the overall sentiment gauge, emotion spread radar, and age/gender breakdown
- Overall Sentiment — the facility-wide 0–100 gauge.
- Emotion Spread — a radar chart of the detected emotion mix.
- Demographics — visitors by age bucket (18-24, 25-34, 35-44, 45-54, 55+) and gender (Male / Female), filterable by All / Identified / Unsure.
Demographic values are AI estimates from imagery (see Security & privacy) — treat them as directional. Their most practical use is comparative: if your Unsure population skews very differently from your identified members, that cohort probably isn't members at all — guests, trials, or tailgaters.
Getting reports out
For dashboards, scheduled digests, or your own analysis, the same snapshot data is available programmatically via the insights_report_snapshots MCP tool — see Integrations & MCP. An AI Agent can, for example, post a weekly summary of visits, peak hours, and access violations to your team chat.
Related pages
- Access zones — the structure all zone analytics depend on
- Settings → Sentiment Scoring — how the sentiment score is computed
- People timeline — where the drill-down links land